Experts explore: Uta Green on using her new studio as a testing ground
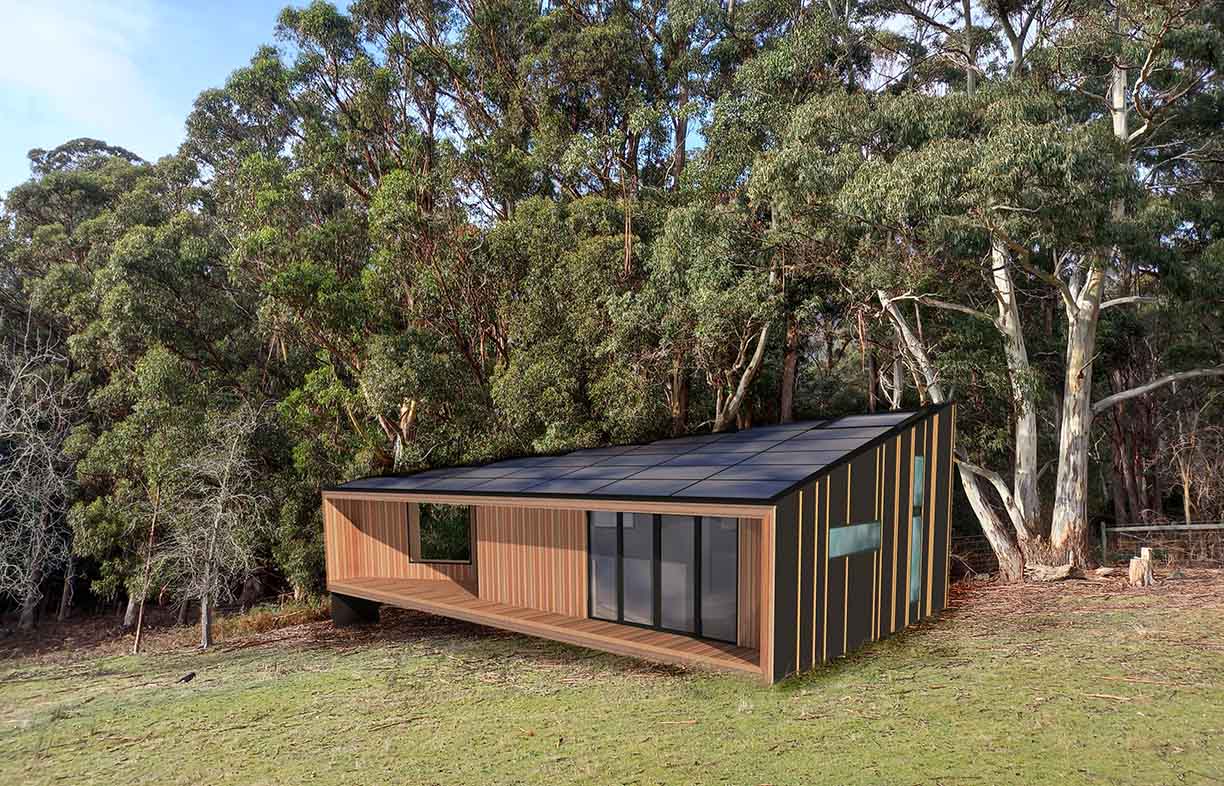
Sustainable design is a complex beast, involving a progression from high-level decisions on form and function down to fine-tuning design details and material choices. Uta Green of Green Design Architects explains the design process for her practice’s new studio in Hobart, including using iterative energy ratings to optimise the small building’s performance.
Our new office
We live on the edge of Hobart, in the bush under kunanyi/Mt Wellington. Life is so good here that we don’t want to leave the place for work, so for the past few years we have made space for the office in our home. But with more staff joining Green Design, it is time for a dedicated office, and we have space in the paddock behind the house. The site is in a perfect position at a bus stop and on a cycle route, but has a few constraints: the lowest bushfire attack level (BAL) part of the block is squeezed between a drainage easement and a thoroughfare, which results in an unusual triangular shape.
Reducing the footprint
For most small building projects, three interlinked parameters determine what is achievable: cost, quality and size. We are never willing to compromise on quality, by which we do not mean gold-plated taps or marble benchtops; what is important is thermal comfort, detailing, longevity, accessibility and good design as well as a clean environmental conscience. Environmental sustainability usually costs more than standard solutions. As my partner David likes to put it, “Do you wish to save the world or your hip pocket?” If you want to do both, you have to reduce the size. This is also the best way of minimising the embodied energy.
So the footprint of our new studio is minimal at 42 square metres, but big enough for its purpose. It consists of a single large room with a small kitchen and a bathroom, with a loft above. We have designed it for future flexibility, a key aspect of sustainable design: after its life as an office, the studio could be used as a small house for a couple or as a granny flat.
Testing ground
We took the opportunity to test some ideas on our studio that we have been keen to try out: some to reduce energy use and some alternatives to standard materials.
Trickle ventilation
Passive House performance requires considerable airtightness, and therefore controlled ventilation for fresh air, usually via mechanical ventilation with heat recovery (MVHR) systems. A project of this size is suited to a pair of small decentralised units; however, we have found on previous projects that their low hum is noticeable in really quiet environments, and have therefore ruled them out for a space where people may sleep. A centralised MVHR system may be quieter; in our case, though, this would be a hefty bit of technology for such a small building.
Before we commit to this, I’m keen to try a low-tech ‘trickle vent’ we developed when designing bushwalkers’ huts for the Overland Track in Tasmania’s wilderness. Air that’s had a chance to warm slightly in the cavity behind the external cladding is drawn by convection up and inside through adjustable wall vents. In the mountain huts where electricity is not available, especially in winter when walkers tend to keep windows shut, these vents ensure a healthy indoor environment by steadily introducing oxygen and removing humidity. Because we cannot (yet) quantify the exact airflow, we will probably add more vents than we think we’ll need to our studio, in all walls and at varying heights, and then close some to test the effect.
Water in the walls
Water has a much higher heat absorption capacity than brick or concrete. By putting water-filled containers within the internal timber-framed walls, we avoid the need for high embodied energy concrete or brick walls for thermal mass. This technique has been calculated to perform similarly to a single-skin brick wall. We have used this strategy successfully on a number of residential projects, resulting in as much as one extra Star in the energy efficiency rating, and we plan to do it for our studio too. The beauty of this approach is that it requires no extra space, no strip footing, no embodied energy and hardly any additional cost.
Ditch the fridge?
While the building is an office, keeping four sandwiches and a bottle of milk cold probably doesn’t warrant running a fridge. Instead, we have devised a ‘cool cupboard’ on the deck outside the studio’s thermal envelope, that utilises the chimney effect and evaporative cooling. In summer, pre-cooled air will be drawn through a pipe buried in the ground.
Fine-tuning using energy rating software
Energy assessor Steve Watson of RED Sustainability Consultants, with whom we work regularly, remarks that most of their clients approach them at the end of the documentation stage in order to meet the NatHERS 6-Star minimum requirement. Unfortunately, all design decisions have been made by then. Used as part of the design process instead, energy rating software can be a helpful tool for optimising a building’s performance.
Basically, NatHERS software requires the input of a proposed building’s shape, size, orientation, materials and construction, and calculates the expected heating and cooling energy requirement in megajoules per square metre per year (MJ/m2a), which is then translated into the familiar Star rating.
We regularly request the assessment of a few options for insulation, thermal mass or window types that we are considering for a project. The expected heating and cooling energy requirement for each option can be translated into a running cost over, say, 10 years; this can then be considered along with the initial costs to allow a more fully informed decision.
Our small studio is a good test model for assessing different construction techniques and materials because it is not complex, and the parameters are easy to change for each run of the energy software. We used an iterative approach to energy rating in order to inform our decisions on structure and insulation for the floor and the walls.
Walls
In the coldest Australian climate, a standard 90-millimetre stud wall insulated to R2.5 will comply with the National Construction Code, but it will not necessarily achieve the warmest building. For our studio, Rebecca Boyle of RED Sustainability used the iterative energy assessment approach to help inform the best wall construction. We started with the standard wall as a baseline, then modelled walls of different thickness and construction while keeping all other parameters of the building the same. See Table 1 for the results.
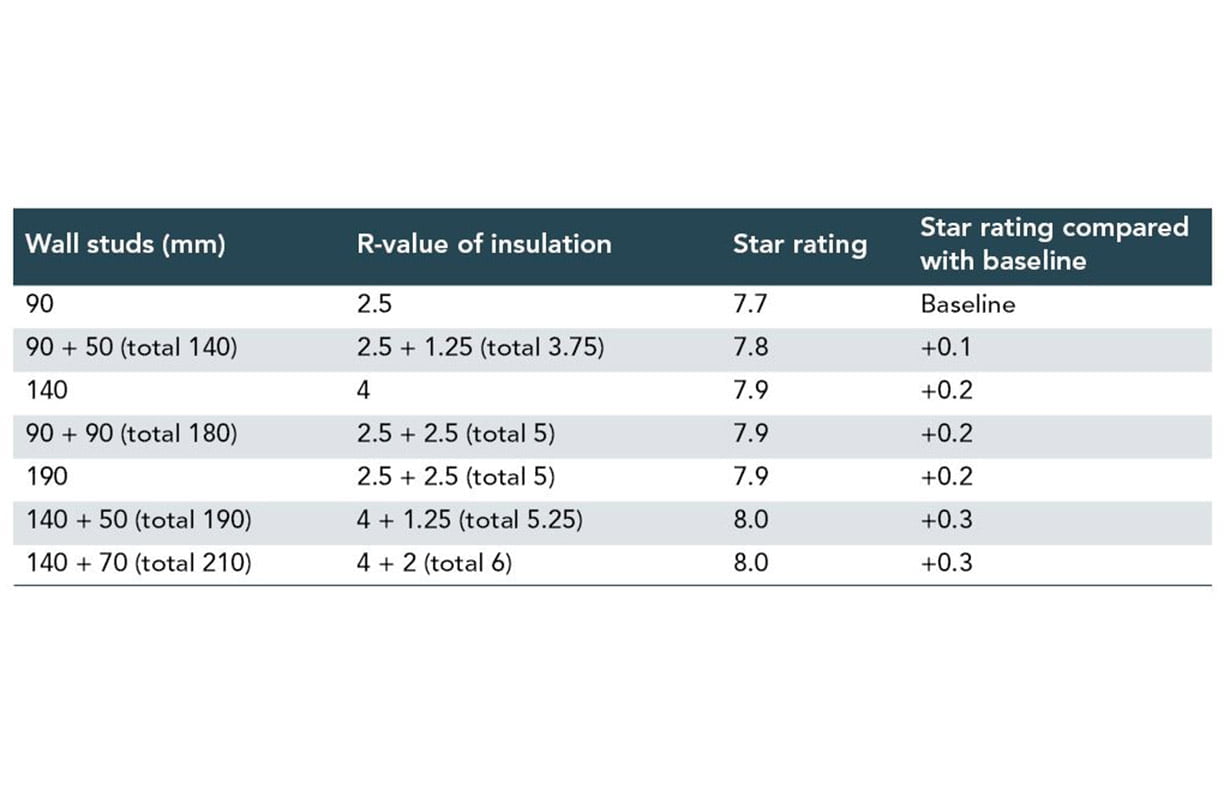
The improvement in Star rating is gradual; the thicker the insulation is, the more we feel the phenomenon of diminishing returns. So the decision comes down to finding the sweet spot between insulation level and construction practicalities. Less common timber sizes come at a price premium; 140-millimetre studs can be three times the cost of standard 90-millimetre ones. 190-millimetre frames are very heavy to tilt up, so we have so far only used them in remote areas where they were lifted in place by helicopter. Therefore, we have also considered two 90-millimetre frames, for ease of frame erection. While builders are not keen on this method as the labour is doubled, it’s a good option for owner-builders as the standard-sized studs are very cost-effective.
Floors
It is a common view that a good passive solar house needs a concrete slab floor for thermal mass. Concrete is a fantastic material in many ways; however, we prefer to avoid it due to its high embodied energy and the fact that it cannot be dismantled without major destruction.
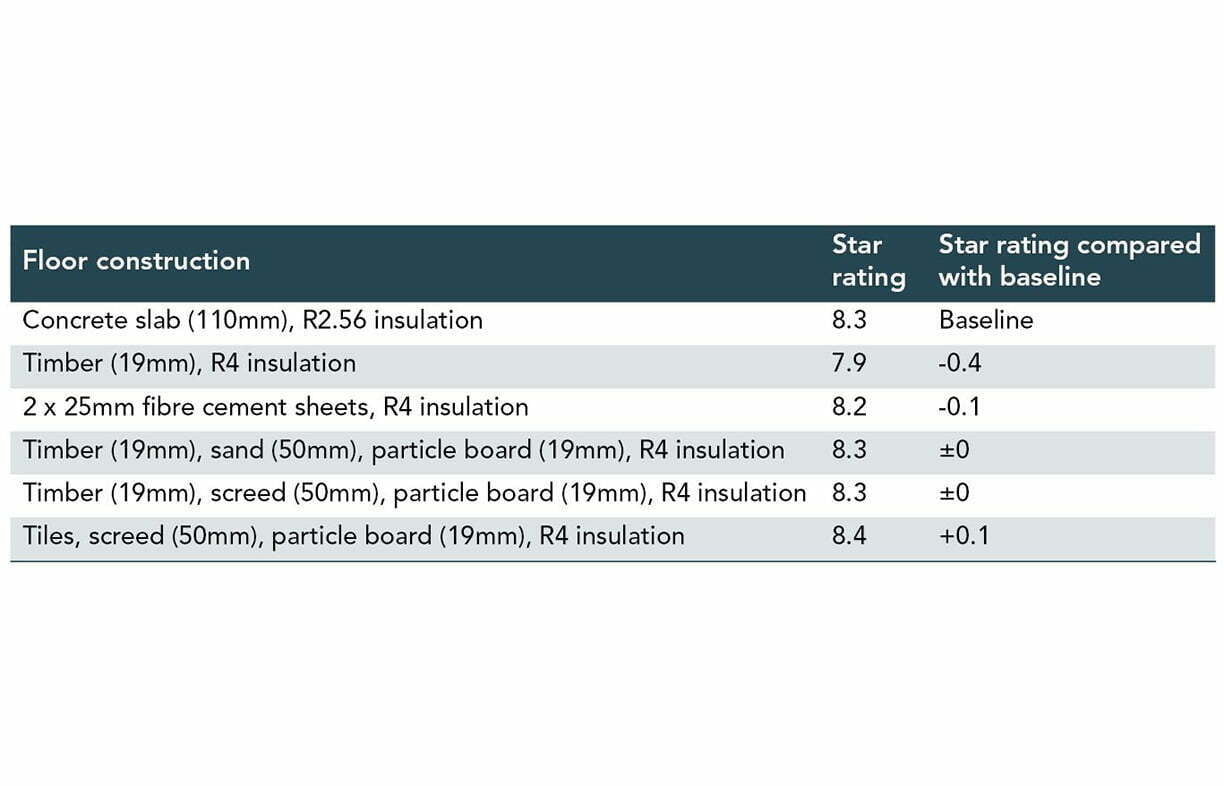
For our studio, we compared the performance of an insulated slab on ground (the baseline), a standard insulated timber floor, and a timber subfloor structure with various thermal mass options (see Table 2), some of which might be surprising. All of these thermal mass layers are only 50 millimetres thick, as that top section of a thermal mass floor is the most active in absorbing and releasing heat.
The baseline rating for the studio with concrete slab was 8.3 Stars (however this does not take into account the heat loss through the footings, so in reality the Star rating would be a little lower). The simple timber floor without thermal mass rated as 7.9 Stars. The other options were pretty close to the baseline, as you can see in Table 2. Reassured that the alternative floor options are comparable with the performance of a concrete slab, we settled for floorboards as the most pleasant floor finish, and will test out the simple thermal mass solution of a sand layer under the timber.
Where we landed
In the end, we decided on thermal mass in the floor, internal walls and also one external wall; insulation of R4 for floors, R6 for walls (in a 140-millimetre plus 70-millimetre double stud frame) and R7 for the roof; and triple-glazed windows (R0.8). The energy rating landed on a creditable 8.4 Stars; in fact we anticipate the actual heating and cooling loads to be lower than suggested by this rating, as the NatHERS default timing and thermostat settings do not align well with our own behaviour – especially while the studio is to be used as an office space.
Passive House calculations
We commissioned certified Passive House designer Torquil Canning to put our proposed studio design through the Passive House Planning Package (PHPP). Torquil rated the building for both intended uses – as an office and as a dwelling – and both met the Passive House standard of a maximum of 15 kilowatt-hours per square metre per year (kWh/m²a) for the heating energy load (the results were 14 kWh/m²a for a dwelling and 10 kWh/m²a for an office). [Ed note: the PHPP uses kWh/m²a while NatHERS uses MJ/m²a; 1 kWh=3.6 MJ.]
It’s interesting to note that for heating load calculations, the PHPP assumes 20 degrees Celsius throughout the house at all times. However, especially in the absence of draughts, an internal temperature a couple of degrees lower than this is perfectly comfortable for many; to maintain 18 degrees instead, the heating energy needed for our studio (as a dwelling) halves to 7 kWh/m²a. This seems to be a good argument for putting on a jumper.
The challenge of comprehensive sustainability
In cool climates like ours, it’s a no-brainer to design homes to be passive solar for a high Star rating, in order to reduce heating and cooling energy use. But while energy efficiency is essential, it is not enough to consider a home truly sustainable: a whole-building approach is needed. It is important also to minimise the embodied energy in the materials and their transport to site, to run the building on renewable energy, to use non-toxic and if possible local materials, to reduce water consumption, to provide for good internal air quality and the health of the occupants, to look after the soil and surrounding ecosystem, and so on. We are very much enjoying and appreciating the process of designing our new studio with all of these things in mind. The construction of the studio has now started, with footings in place, and we are looking forward to seeing the building take shape over the next few months.
Further reading
 Outdoors
Sweet spot: Sustainable midrise for healthy, nature-positive communities
An alternative to both highrise living and urban sprawl, well-designed medium density is the way to go for balancing the needs of people and nature, says ecologist Sarah Bekessy.
Read more Ideas & Advice
All together now: One-stop shops for energy upgrades
If you want to do a home energy upgrade, it can be hard to know where to start. One-stop shops offer advice, information and referrals all in one place; we take a look at what they’re all about.
Read more Ideas & Advice
Case study: 130-year-old cottage goes modern electric
Not sure where to start on the electrification journey? Working with a one-stop shop can help streamline the conversion from a gas to an electric home, as Marnie and Ryan discovered.
Read more

