A mania for monitoring: Beyond the smart meter

When you build a high-performance house, you want to know that it’s performing as expected. Cameron Munro has monitoring in place to do that—and he’s producing some lovely graphs in the process!
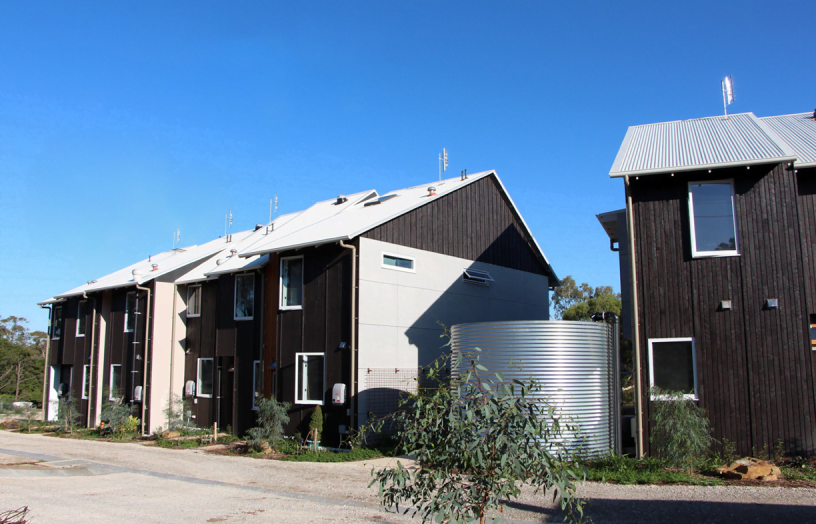
We moved into our renovated home in Melbourne in November 2016, having undertaken an extensive renovation with a focus on massively improving the energy efficiency of the building fabric (for more, see ‘All-electric and hydronic’ in ReNew 141).
Our approach was driven by a desire to produce a comfortable home no matter how hot or cold it was outside and to reduce our operating costs to as close to zero as possible. To do this we used the Passive House approach, a scientific method incorporating extensive modelling and verification. This required very high levels of insulation (including high-performance windows), avoidance of thermal bridges and a building wrap that reduces the air infiltration to about 1/15th that of a normal home. We also opted to remove the gas service; instead, we use heat pumps to provide hot water and space heating. We also installed a 6.4 kW solar PV system.
Having gone to what is, by Australian standards, extreme lengths to improve the thermal performance of our home, we were keen to understand exactly how well it performed against our expectations and modelling. Knowledge is power—we want to be able to run our home in the most energy-efficient way and to do this we need to have a good understanding of how it functions. Thus we decided to install monitoring that is well beyond the norm.
The big picture
First up, we’ve kept track of our electricity bills. Over the most recent 12 months we have exported 20% more power to the grid than we have consumed and our net electricity bill was $627, of which two-thirds was the fixed supply charge. This bill includes cooking, hot water, heating and cooling as well as our plug-in hybrid car. The car accounts for about a third of our electricity consumption and this bill of $627 contributed to driving around 9000 km over the year in all-electric mode. If we were to exclude the car we’d have earned about $520 over the year.
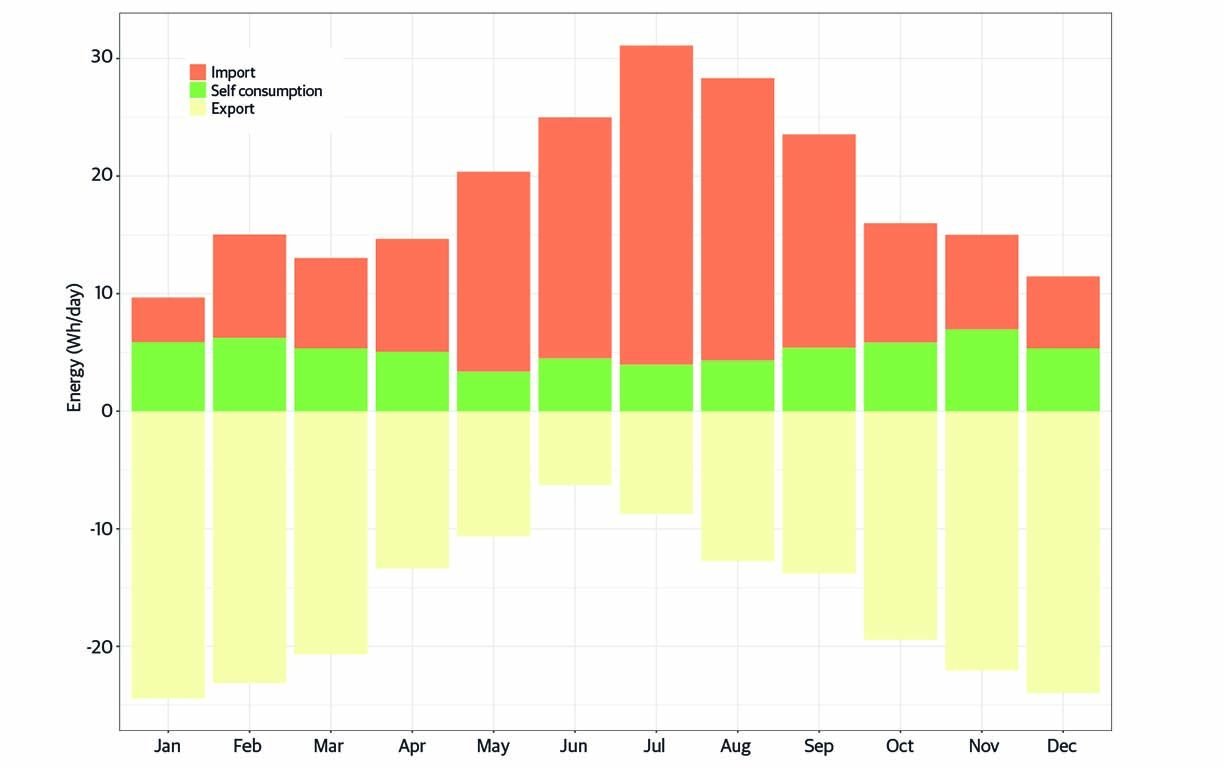
Over the 12 months we exported 6071 kWh to the grid and imported 5135 kWh. Our consumption of around 19 kWh/day is high compared to many households, but bear in mind that about 7 kWh/day is used by the car, 2.5 kWh/day for hot water and in winter we’re using about 8–15 kWh/day for heating. Figure 8 shows our month-by-month consumption and export.

Solar performance
Our solar PV system has a SolarEdge inverter and SolarEdge DC optimisers—the latter mean each panel performs independently of the others—thus, if one panel is shaded, it doesn’t pull down the performance of the others.
It also means I can readily check online or via the SolarEdge phone app how the system has performed, and indeed how each panel has performed. This has been interesting to see how our western panels are performing in comparison to those facing north, as well as those which are partially shaded at different times of the day (this can be seen instantaneously, but not historically … yet). But probably most reassuringly, it provides the confidence that all panels are functioning correctly. Given solar panels make no noise or movement, this is indeed reassuring.
Appliance monitoring
While our smart meter tells us how much electricity we’re exporting or importing from the grid, and the solar inverter tells us how much power we’re generating in 15-minute increments, neither tell us exactly where we’re using energy in the home. Knowing when big loads are running, such as when the car is charging or the heat pump is operating, we can make reasonable guesses.
But we are interested in a much finer-grained understanding of how and when we are consuming energy. To do this we installed an IoTaWatt energy monitor. The monitor itself cost about $230 shipped from the UK and then there was the cost ($7 each) of the current transformer (CT) clamps that measure the current in the wire through magnetic induction (the current through the mains wire they are clamped around produces a smaller but proportional current in the clamp, which the energy monitor reads). We needed 14, one for each circuit in our home. The clamps must be installed by a licensed electrician in the meter box. Beyond this it requires a small amount of software setup, including calibrating the AC input. This isn’t particularly difficult, nor does it require specialist expertise.
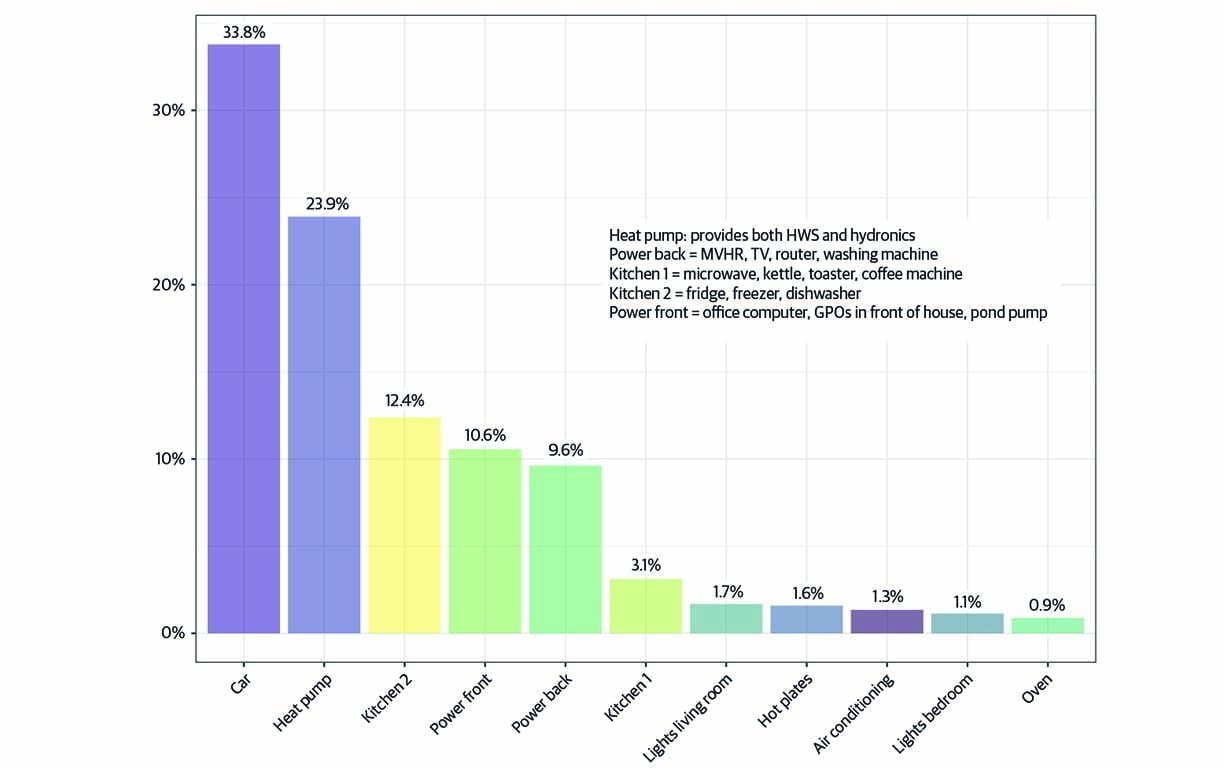
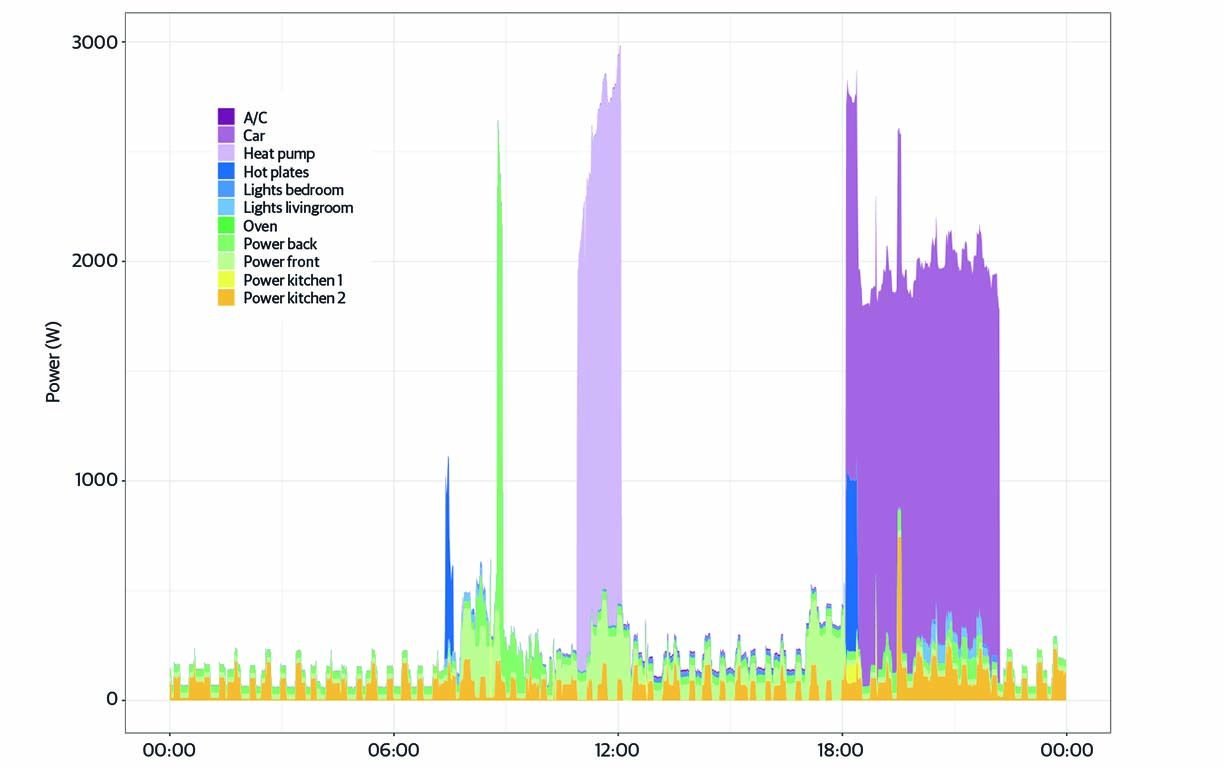
The IoTaWatt device logs each of our 14 circuits every 10 seconds, and has meant we can identify how much energy is consumed by the car, heat pump, oven, lights and so on. The only restriction is on how the circuits are wired into the home; for example, our fridge, freezer and dishwasher are all on one circuit so we’re not able to differentiate between those.
We’ve only had the IoTaWatt active for around four months, but it has demonstrated that, when we have no heating requirement, around a third of our energy consumption is car charging, with negligible air conditioner requirements in summer as the building rarely gets uncomfortably warm (Figure 1). Lighting is another very minor energy user, at least during summer. But even in winter we expect it not to contribute significantly given all lights are efficient LEDs.
The data has already helped identify issues. For example, the hot water storage tank provides both hot water for showering and is connected to a small hydronic heating system. However, after running a test in January we’d forgotten to close the valve to the hydronic pipework, so the tank was losing significant amounts of heat via this pipework. This has been costing us about 1 kWh per day over summer and only became apparent when I checked the standing tank loss on days when we were away (so there were no other draws on the hot water). According to the tank manufacturer the tank has 60 mm of polyurethane foam insulation, and I’d added an R 1.5 blanket, so I would have expected the standing heat (energy) loss to be under 0.5 kWh/day. Instead, the IotaWatt was reporting that we were using around 1.5 kWh of primary energy into the heat pump on these unoccupied days (at a COP of 3, this equates to around 4.5 kWh a day losses). We’d have been highly unlikely to notice this using the meter consumption data alone, particularly as the heat pump only comes on during summer during the middle of the day to coincide with solar PV production. This lesson points both to the usefulness of detailed data in identifying a problem, the significant issue that is heat line losses in hydronic systems and the inherent complexity of such systems.
Indoor comfort
The strongest motivation for our renovation was to achieve very high levels of thermal comfort. We were interested to monitor the temperature and humidity inside our home to verify the performance against what we’d predicted.
While commercial devices are available to measure temperature and humidity, I enjoy tinkering with electronics and software, and particularly appreciate the ability to customise devices to my needs that more than likely wouldn’t be possible with commercial devices. There are many sensors available now that are highly accurate and extremely cheap for temperature and humidity sensing.
I settled on a setup using very cheap DS18B20 digital temperature sensors (Figure 2). These cost less than $4 each with an accuracy of +/– 0.5 °C. These sensors also come in a waterproof package; I’ve found this useful for measuring subsoil temperatures around our ground slab. I also embedded four of these sensors in the rammed earth wall that provides thermal mass in our living room. Where I’m also interested in humidity, I use the HTU21D sensor, which provides relative humidity readings to a claimed accuracy of +/– 5% and temperatures to +/– 0.3 °C. Again, these can be sourced readily for well under $10 each.
As I was interested in a flexible sensor layout I couldn’t rely upon proximity to power outlets, so the sensors needed to be battery-powered. The Particle Photon is a tiny, low-powered microcontroller with wi-fi that enabled a flexible, low-cost sensor platform that can automatically upload sensor data to the internet (so-called ‘internet of things’). The Photon itself costs around $30. The setup, including Photon and battery holder, can be assembled into a small enclosure, with the sensor sticking out of the bottom of the enclosure a little so that it measures the temperature external to the enclosure. When powered with four AA batteries, each sensor unit can run for over six months while sampling every hour. The Photon is a very flexible device that can easily be programmed by anyone with experience in C programming or in using other microcontrollers like the Arduino. The end result is a sensor package that is 80 x 60 x 35 mm and can be placed discreetly on a bookshelf or anywhere out of the way.
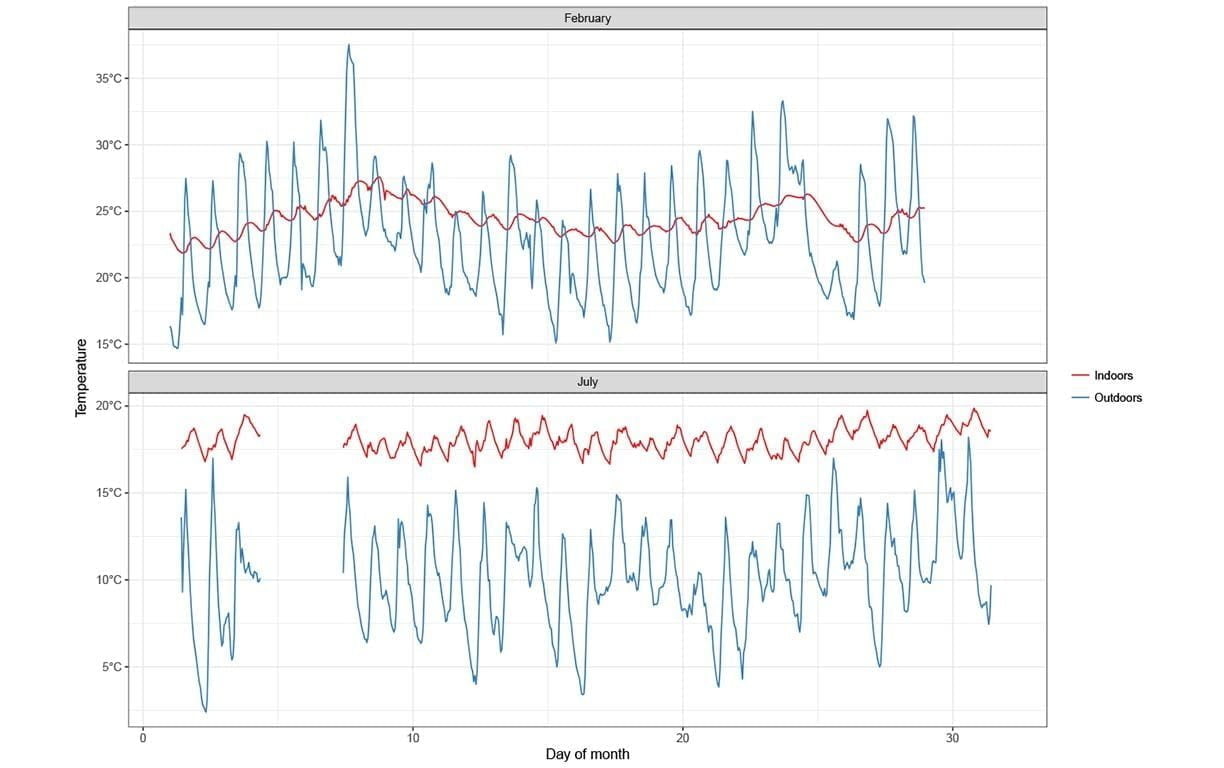
We’ve been able to use this data to confirm the home is performing as hoped. For example, Figure 3 shows that in summer it takes a long time for the home to heat up during hot spells; you can see that the home never heated beyond 27 °C during a week of gradually escalating temperatures which peaked at 37 °C.

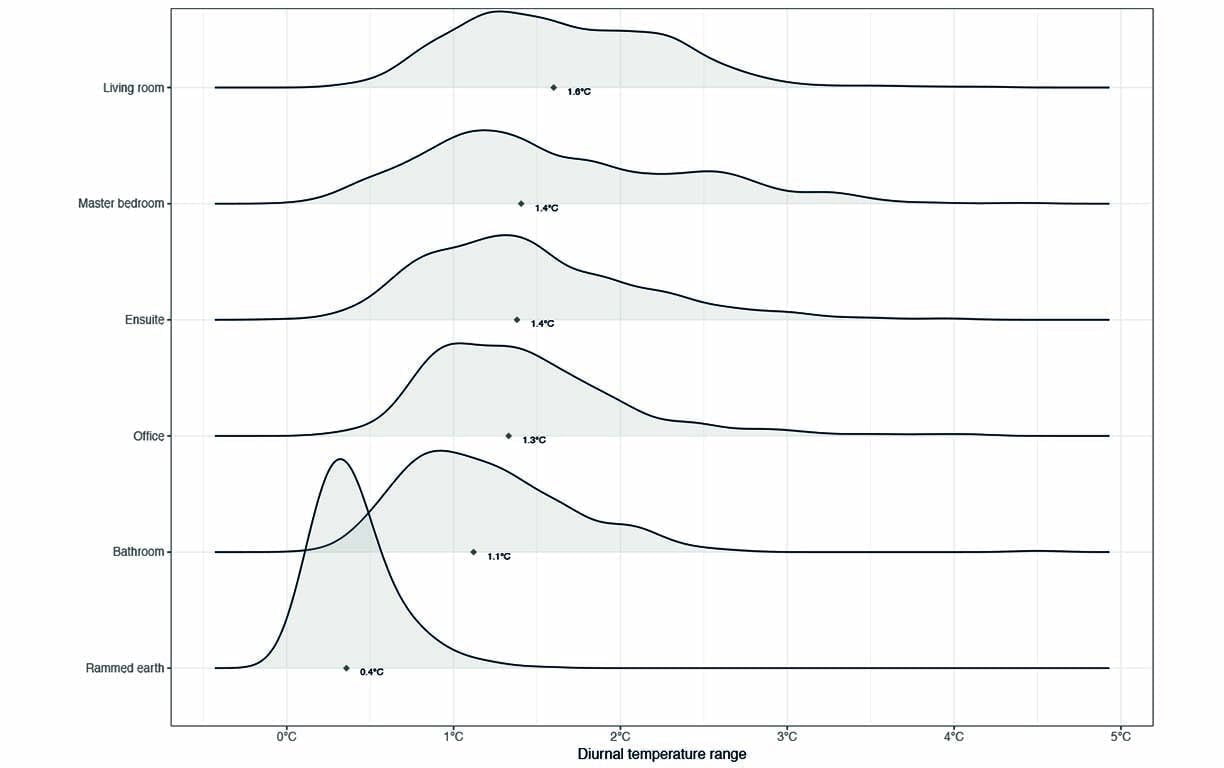
Similarly, in winter the temperature at night never dropped below 17 °C. In both of these cases, there was no air conditioning or heating used (in winter, the hydronic heating comes on for a couple of hours in the morning and evening, and is off overnight). Moreover, there is very little diurnal temperature swing—the temperature tends to vary by less than 1.5 °C across the day (Figure 4). This compares with the outside temperature, which tends to vary by 9 °C or more on a typical Melbourne day.
We’ve got a rammed earth wall in our living room, which has the primary purpose of being aesthetic, but also aims to provide thermal mass and reduce the diurnal temperature swing. We find that most of the time the rammed earth is operating very close to the indoor temperature, but during the infrequent extremes of temperature it is moderating the indoor temperature—that is, when it is cold it is warmer than the room and when it is very hot it is cooling the room (Figure 6).

Indoor air quality
One of the unusual attributes of the Passive House approach is extreme attention to airtightness. Our home achieved an air leakage rate of 1.2 air changes per hour (ACH) at 50 Pa. This means at 50 Pa of pressure difference (equivalent to a strong wind) the home would lose or gain around 1.2 building volumes of air per hour. This is much lower than a typical Australian home; even a new home would do well to achieve an air leakage of 10 ACH @ 50 Pa, and most are in the range of 15 to 30 ACH @ 50 Pa.
Having achieved very high levels of airtightness, mechanical ventilation becomes necessary to ensure a consistent and controlled inflow of fresh air. We monitor the performance of the ventilation system using Senseair K30 CO2 sensors, which cost about $110 each. Again, these can be readily interfaced to the Photon microcontroller. It is generally accepted that CO2 levels should be below 1000 ppm for good indoor air quality, and that CO2 levels are a fair proxy for more toxic gases that can build up in a home such as carbon monoxide. That being said, as we don’t have gas for heating or cooking, or a fireplace, there are negligible sources for some of these gases.
We have found that the CO2 level tends to stay in the 500–800 ppm range under standard occupancy with the windows closed, and only tends to increase to above 1000 ppm when we have a large number of guests (a solution, if deemed necessary, is simply to open a window as in a normal home or turn up the mechanical ventilation). The importance of the ventilation system at these very high levels of airtightness is well illustrated by the test shown in Figure 5 where we’ve turned the ventilation system off and CO2 concentrations are well above 1000 ppm. Once the mechanical ventilation is turned on CO2 levels return to acceptable levels within two to three hours.
Humidity
Our monitoring shows that most of the time the indoor humidity is 50% to 60%, which is well within comfortable levels.
Interestingly, we don’t have externally vented exhaust fans in the bathrooms. Instead, the mechanical ventilation heat recovery (MVHR) unit serves this purpose. You simply flick a switch before showering and the ventilation system ramps up to high. This extracts the moist air from the bathroom and, given the heat recovery aspect of the ventilation system, also extracts the heat from this air before it is ejected from the home.
We’ve found this works well. Moreover, when the ventilation system is operating in standard mode, the movement of air is towards the wet spaces, so humidity doesn’t backflow into the bedrooms or elsewhere. In practice, the fact that the ventilation system is operating 24/7 as opposed to an extractor fan operating for a few minutes at a time, the humidity levels in the bathroom are much lower than in a normal home.
Hydronics vs reverse-cycle
As we head into our second winter, we plan to compare the electricity usage of heating via our hydronic system to instead using our reverse-cycle air conditioner (which is situated on a wall in our living area). Based on last winter’s observations, we estimate that the hydronic heat pump uses around 8–15 kWh per day for winter heating, but this year, with the far more precise consumption data as illustrated in Figure 7, we should be able to work out our input electricity requirement with precision. Although the way in which the heat is distributed into the home via the hydronics is convenient, we suspect it is not as efficient as using the reverse-cycle air conditioner. Now that we’re set up with good data logging we’ll be able to run tests to see just how well both systems perform. Stay tuned for the results!
Cameron’s house is opening for Sustainable House Day on 15 September 2019. Find the house at www.sustainablehouseday.com—it’s ‘Armadale Passivhaus’ in postcode 3143.
Further reading
 Heating
A tale of three winters
In a well-designed house, can you get by without heating? And how does far infrared heating compare to split systems, for efficiency and comfort? Jenny Edwards put her own home to the test.
Read more Energy monitoring
Small loads that add up
In our hyper-connected world, we rely on a range of devices that are always on, like internet modems and routers, and NBN boxes. But how much of a problem is that for energy usage?
Read moreCameron’s home is opening for Sustainable House Day on September 15! You can visit his house by registering here.


