A draught sealing buyers guide
As we head towards winter, draughts can make your home far less comfortable than it should be. Lance Turner looks at options for sealing up your home for a cosier cold season.
It is generally recognised that unwanted draughts in a home make the home perform poorly thermally, compared to a home that is well sealed. With airflows into and out of a home, energy also flows due to the temperature differences between the interior air and the air outdoors. In summer, air flowing into a home can heat it up, while in winter, warm air flowing out of a home is replaced with cold air, cooling the home and making heating work harder (and cost more to run).
There are desirable draughts, which are usually controllable, such as when you open windows at the end of a hot day to vent out accumulated heat, and there are undesirable draughts, which you have no immediate control over. Generally speaking, unwanted draughts can be caused by gaps between building components or around built-in appliances and equipment such as lighting (particularly recessed downlights).
A home’s level of airtightness is rated in the number of air changes per hour that occur when there is a 50 Pa (pascals, a mere 0.007 psi in the old measurements) difference in air pressure between the indoor pressure and that outside. The ultimate sealing standard for homes is the Passive House standard, which allows for no more than 0.6 ACH50 (air changes per hour at a pressure differential of 50 Pa). This is an extremely tight standard, and very few homes meet (or indeed should meet) this standard. In Australia, the average home is more likely to be 20 ACH50 or worse.
So how airtight should your home be? For most homes, to maintain an acceptable level of comfort without requiring excessive heating or cooling (assuming the house is also correctly insulated, orientated and shaded), an airtightness of 5 ACH50 is enough, with few Australian homes reaching this level. See box for more on testing airtightness.
Why seal gaps?
There are many reasons to seal gaps in a building envelope. The first, as mentioned, is to keep conditioned air where it belongs: inside the home. This reduces air conditioning (heating and cooling) energy use and bills, but also reduces other negative effects of excessive air leakage that may not be immediately obvious.
For example, in winter, draughts can reduce the comfort of a home by making you feel cold, even in a heated home. You may not feel the draughts, but cold air pools at floor level (cold air is denser and hence heavier than warm air) and so can result in cold feet and a general feeling of being cold. This is known as stratification, where differing air temperatures form into layers. This can be particularly noticeable in winter if you have warm air coming from ceiling ducts or high-mounted reverse-cycle air conditioners.
Severe air leakage can even result in noticeable air movement inside the home, such as feeling a cold breeze inside the home when it is cold and windy outside. Wind pressure can force considerable amounts of air through even small gaps and can result in a very uncomfortable home in severe winter conditions.
The incoming air may also bring in more or less humidity than desired, making the home uncomfortably humid, or excessively dry.
Air leaks also let in more than just air, bringing dust, pollen and other pollutants into the home. Large enough gaps can even let in insects, spiders and small critters such as mice.
Gaps also let in something else that can affect health and wellbeing: noise. More noise creates more stress, especially noise that is particularly undesirable, such as traffic or construction site noise. Sealing gaps can help reduce indoor noise levels.
Draughts can also affect the operation of thermostats. For example, a cold draught near a thermostat can make the thermostat run the heating more than needed, overheating other parts of the home.
Where are the gaps?
So, you are tired of living in a cold home in winter (or a hot home in summer) and want to start sealing gaps. But where are they, and how do you find them?
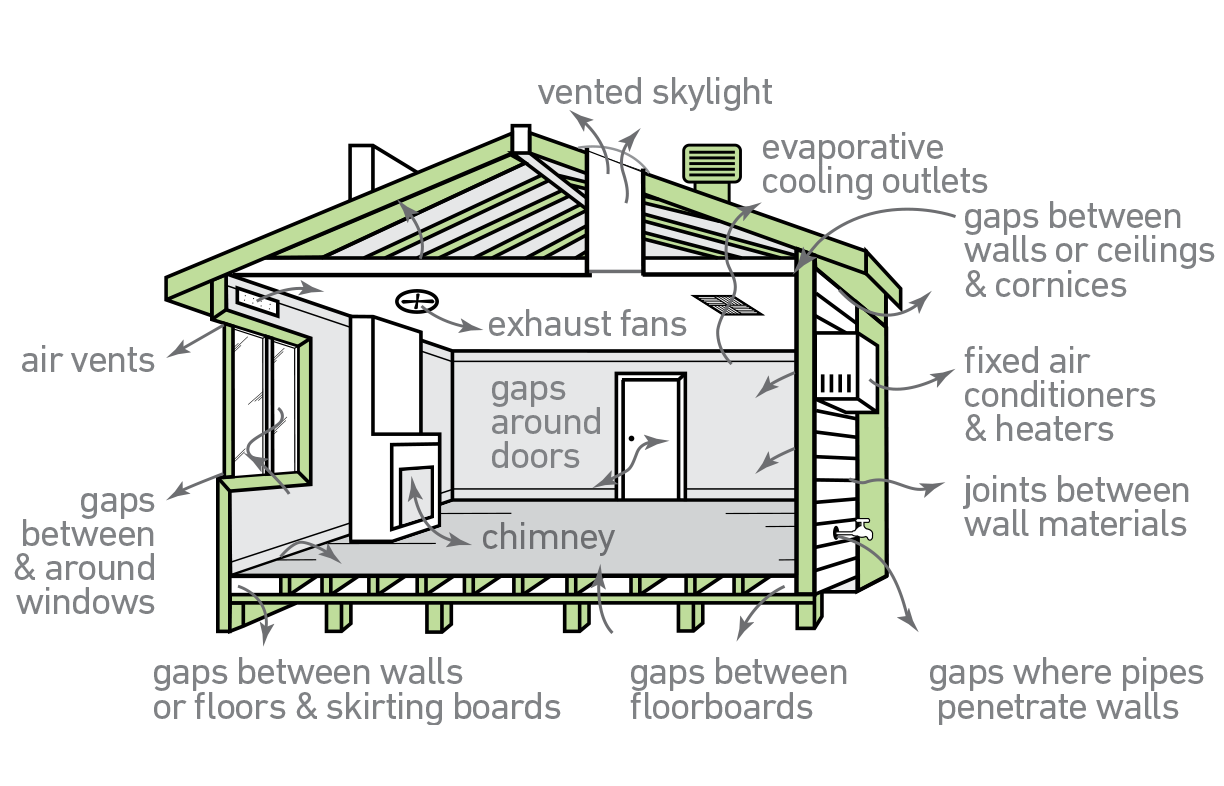
Well, gaps have a number of causes. They can come about from poor building practices, such as misaligned cladding and lining, poor fitting of window frames into openings or poor fitting of built-in appliances. Gaps can also appear through wear and tear, especially of door and window seals or even cracks in walls through soil movement.
- gaps around window and door frames where they meet the wall linings, that were not sealed when the windows and doors were installed (poor building practices)
- gaps between the window frames and the window jambs (old sash windows are notorious for this)
- gaps around doors where they fit the frame, especially older doors that have warped over time
- window and door seals that have failed over time; this can be a problem even for the best designed windows and doors, especially in dusty areas where dust abrades the seals as the windows and doors are operated
along skirtings, cornices and trims, where these mouldings are often just nailed on or held in place with a few blobs of glue. This is particularly a problem for older homes with uneven walls, ceilings and floors. - pipe and cable penetrations to bring services into the home. This includes wherever holes are drilled from outside to inside. Pipework in particular can be a problem, with gaps (sometimes very large gaps) often being found around pipe entry through walls and floors
- duct penetrations, including air conditioning ducts, rangehood and clothes dryer ducts where they pass through walls and ceilings
- electrical outlets; these are less obvious, but a poorly fitted electrical outlet can also let in draughts
- around built-in appliances such as air conditioners and dishwashers, especially where the appliance penetrates the inner lining of the house. Often, lining is poorly fitted or omitted altogether behind built-in appliances (poor building practices) resulting in huge holes in the building envelope
- between floorboards, especially in older homes that don’t have tongue-and-groove boards. The sheer area of a wooden floor can make for a vast area for air infiltration.
- chimneys and flues where they pass through walls and ceilings. Also, solid fuel heaters such as wood heaters can leak air via the air inlet/firebox/flue flow path, even if the heater is not in use
- skylights and lightshafts, especially if interior diffusers are ill-fitting and the external light dome isn’t well sealed, or the duct itself leaks air, which can allow air to flow between the roof cavity and the house interior
manhole hatches. These often have no form of seals, especially on older homes. They often consist of a simple board sitting inside a frame, with any misalignment in the frame construction or warping of the board resulting in gaps - lighting, particularly light fittings that penetrate into the roof cavity, such as recessed downlights. These can allow large quantities of air to flow between the roof cavity and the house interior, especially if the light fittings are of the older ventilated type
- exhaust fans without draught seals. These are effectively large holes in the ceiling and can allow a great deal of air to flow, producing considerable draughts
- wall air vents. These are usually found in older homes and are now generally considered unnecessary due to the elimination of most open-flued gas heaters and open fireplaces. They can leak a considerable amount of air, as indeed they were designed to do!
- dog and cat doors. These usually have minimal or no seals, and so allow considerable air ingress.
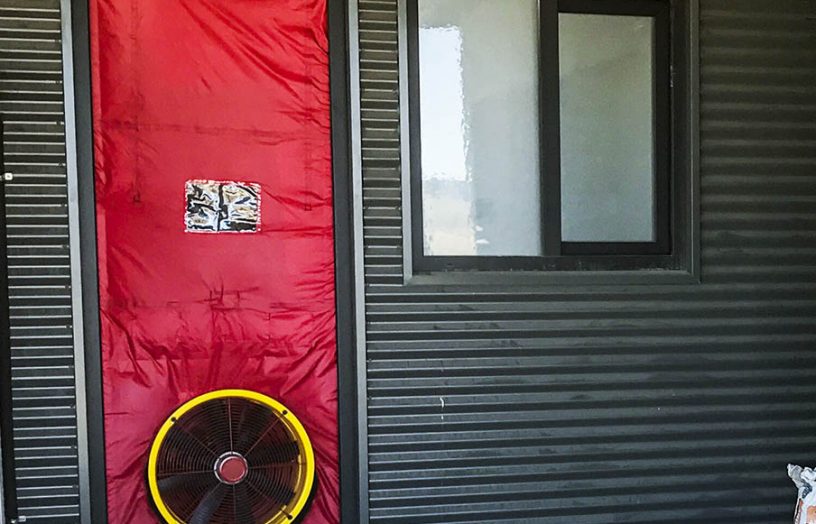
Testing for airtightness
Airtightness testing on homes is done using a blower door test (en.wikipedia.org/wiki/Blower_door). This involves closing all windows and doors, and running a special blower fan that has been sealed into one doorway or window for the test (see photo).
The blower is run to produce a pressure differential between indoor and outdoor pressure of 50 pascal (Pa). The rate of air flow out of or into the house at this differential gives the airtightness rating of the house, as an air changes per hour figure. For example, if air exits the house envelope at a rate that would turn over all the air in the home 5 times every hour, then the rating would be 5 ACH50.
From the rate of airflow measured by the blower door test, the effective leakage area can be calculated, allowing leakage at other pressure differentials to also be determined. A ‘normalised’ pressure (typical of air leakage for low-rise buildings) is around the ACH50 rating divided by 20 (bit.ly/2SMRtQm). Different normalised standards are used in different countries, and apply in different situations, so there is no simple conversion between ACH50 ratings and typical ACH figures. As an example of the complexity of airtightness testing, read AIRAH’s document ‘Air Tightness Metrics to Improve Australian Building Envelope Integrity’ (bit.ly/2tP4ajJ).
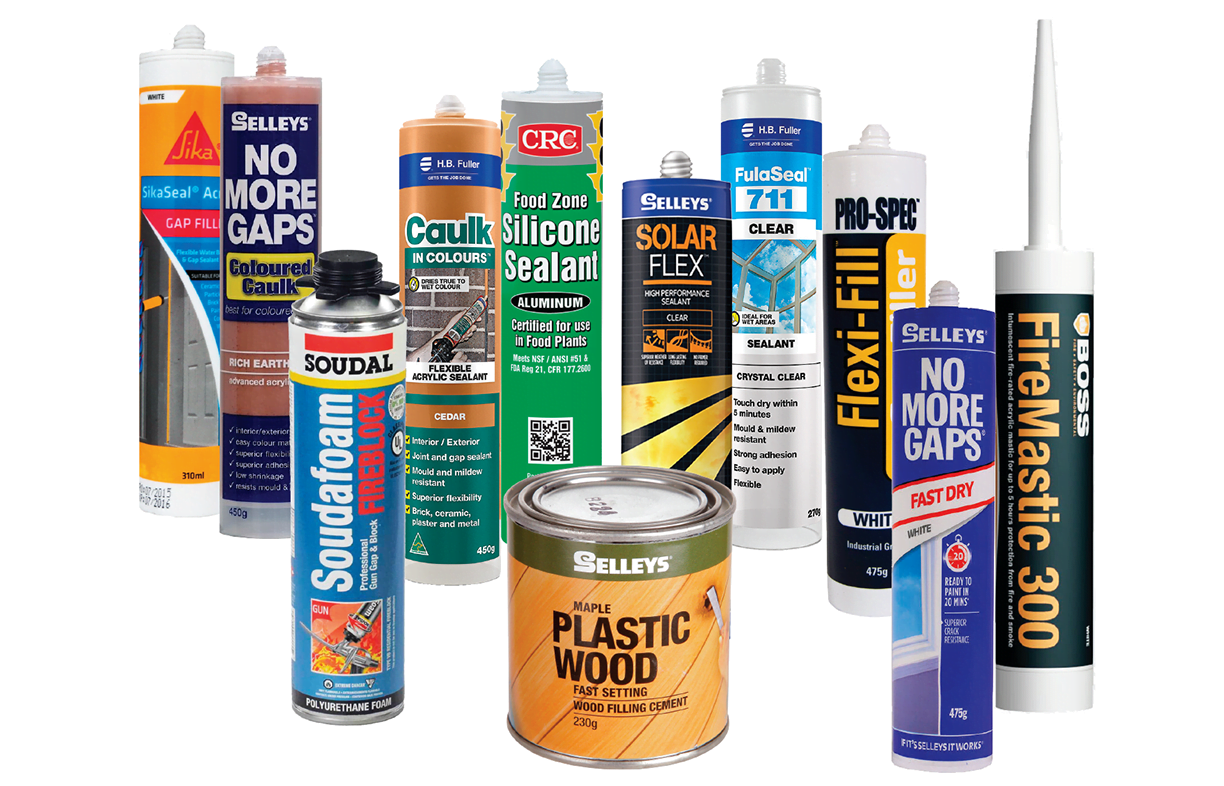
‘Moving’ gap sealing: doors and windows
For most people, the easiest job to tackle, and the one with the greatest effect, is to seal the gaps around windows and doors where they fit into their frames. If you have a newer home with windows in good condition, then they should have decent quality seals already fitted and you may not need to do anything. But for anyone in an older home with older windows, there will most likely be no seals at all.
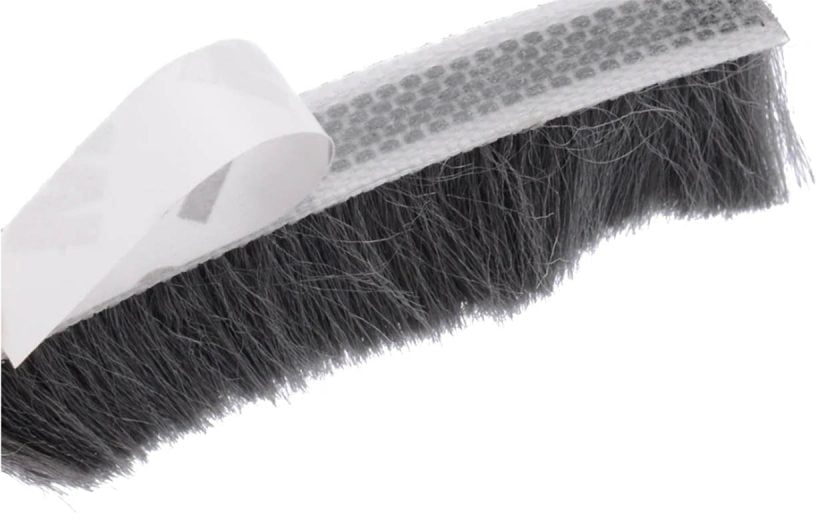
The type of seal used will depend on the type of window or door. There are many types, but they fit into two broad categories: those that slide, and those that hinge outward (or inward). Hinged windows are the easier to seal, and there are many after-market weather seals, nearly all of which are compression seals (the seal is compressed by the closing door or window). They are available from almost any large hardware store.
- brush types (closely packed soft bristles that conform to the gap to be sealed)
- soft foam strips that compress between gaps as doors and windows are closed
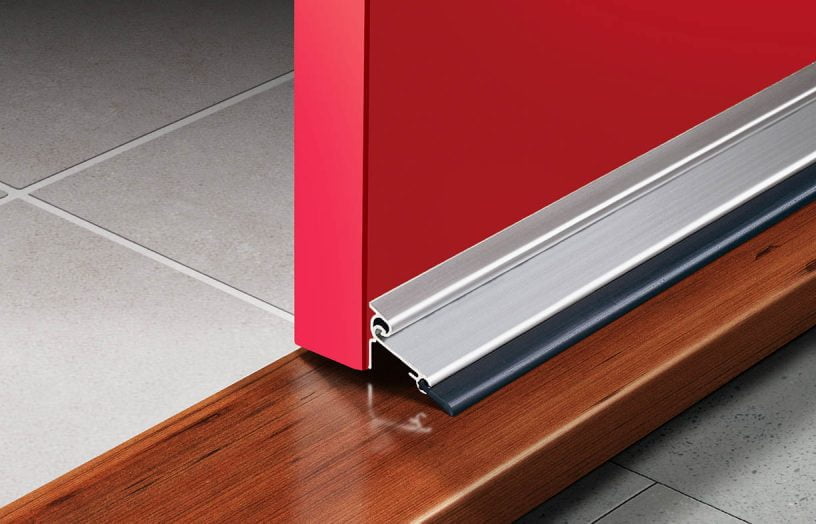
- gaskets (usually a very soft extruded material with a D-shaped cross-section, such as the RP48 seal from Raven)
- rollers (usually fitted to the bottom of doors)
- moving seals (usually fitted into the bottom of doors to cater for uneven floors)
- automatic seals (also fitted to the bottoms of doors; they can cantilever up and down to cater for uneven floors, floor trims etc)
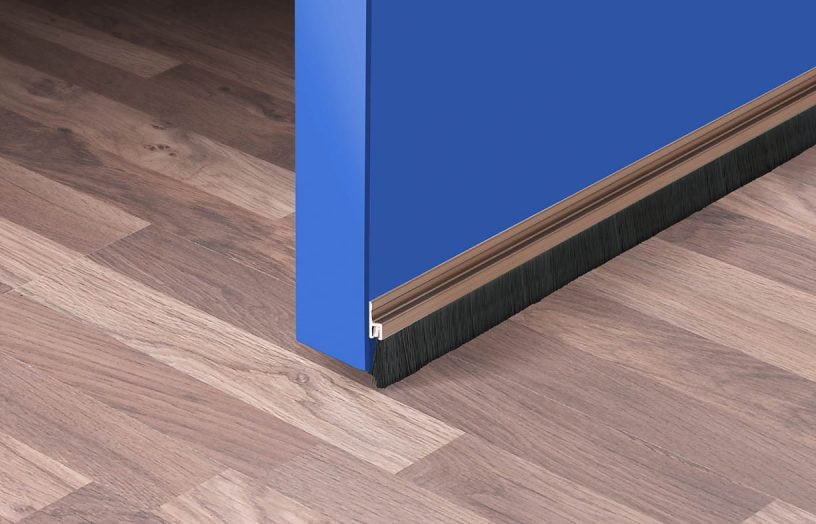
- weatherproof seals (consisting of an aluminium floor trim and a matching door seal).
Many of these seals are quite low cost, but their effectiveness varies depending on the condition of the doors and windows. For example, a 6 mm foam strip may only be suitable for sealing gaps between 3 and 5 mm—any larger and the seal isn’t effective, any narrower and the foam has to be crushed too much, making it difficult to close the window or door.
If your doors or windows are old, they may have gaps that vary considerably, and the most common seal types may not be suitable. There are, however, seals that can cover greater gap ranges without problem. For example, a soft brush-type seal I purchased directly from China (as there was no equivalent I could find here) has a 10 mm thickness of very soft fur-like bristles. I have found this to be able to seal gaps up to 8 mm or so effectively, while crushing down easily to as little as 3 mm—this proved ideal for helping to seal our very old, very not-straight front door.
An alternative type of seal is the Draught Dodgers seal from ecoMaster (ecomaster.com.au), which consists of a soft, flexible V-shaped seal attached to a wooden profile. You just cut the seals to length and stick them into place, producing a door seal that looks like it was part of the original frame while being able to seal gaps up to 10 mm. The main drawback with these seals is their price; starting at $70 per door, they are one of the more expensive seal systems on the market, but also one of the best designed and most effective.
The Raven RP78 is a similar seal; it works in the same way, but uses an aluminium seal carrier instead of a timber one (a timber version is also available, the RP113 seal), and an enclosed tube-like rubber profile that can seal gaps up to 6 mm. It is simply screwed into place and the trim cover fitted to hide the screws. Again, it is quite expensive, costing around $100 per 5-metre length (enough for one typical door), but the end result will last much longer and most likely perform better than cheap stick-on seals.
In general, seal durability depends on the quality and type of material used in the seal and whether the seal is subject to abrasion, either from doors/windows sliding over the seal, or from external dust. It pays to keep door seals clean if you want them to last, especially if you live in a dusty area.
Most lower cost seals are of the adhesive type: you cut the seal to length, peel off the backing paper and press the seal into place. You need to prepare the receiving surface first by cleaning, usually with alcohol such as methylated spirits, and sanding off any dags in the paint that may cause the seal to lift off.

Seals with a wooden or metal carrier are either screwed or taped into place, depending on the design of the carrier.
While hinged doors and windows are easy to seal using compression seals, sliding doors and windows represent more of a challenge. Modern doors and windows, sliding or otherwise, will usually include seals, but if you need to retrofit older doors or windows, your options are limited and producing a satisfactory result can be difficult.
EcoMaster has a kit for cavity sliding doors. Door Seals Australia (doorseals.com.au) has seals suitable for sliding wooden doors and provides a sealing advisory service.
Another challenging area is sliding frameless windows (and doors). These may or may not have a seal already fitted to exclude draughts between the two overlapping panes of glass, but, if not, ecoMaster has a simple seal (Draught Excluder For Shugg/Frameless Windows, code number GCE6) that pushes onto the edge of the glass pane and seals against the adjacent pane.
Sealing doors and windows isn’t just about sealing the actual windows/doors against their frames. You can reduce draughts through these areas by providing protection for external doors and windows from direct prevailing winds. Screens/walls and similar wind deflectors can greatly decrease the airflow even through unsealed doors and windows. If you have a windy aspect and adding some form of deflecting walls or screens is relatively easy, it is worth considering, especially if the walls or screens can double up with other uses, such as for growing climbing plants.
Also consider automatic door closers, on both external and internal doors. An example of an internal door closer might be on a boot/mud room door, which may otherwise be left open, or even on laundry doors, as laundries often have the back external door.
Lastly, don’t forget about pet doors. Most sold in Australia do not seal out draughts well, having rudimentary seals that often don’t last long. Many will also blow open in high winds, effectively creating a large hole in the building envelope. The best sealed doors we have found are made in the USA by Freedom Pet Pass (energyefficientdogdoors.com).
** For tips on sealing fixed gaps, floorboards, appliances and vents, chimneys and flues, and actions suitable for renters, please see the full buyers guide in Renew 147.
Detecting draughts and leaks
While some gaps are obvious because you can see them, others are less so. There are a few ways you can detect leaks, but one simple one is to close all windows and doors, turn off any air conditioning but turn on any exhaust fans that vent to the outside (the fan will have a vent grille on the wall or cap on the roof if it vents outside) to create negative pressure inside the home which will draw in outside air through any gaps. Then wander around the house with a lit incense stick (or some thin strips of tissue paper on a stick or coat hanger) running it along skirtings, windows and door frames and anywhere else there are joins in the building envelope. Draughts will be visible in the smoke as incoming air pushes the smoke back into the room. This method is a good start, but also check out the Your Home website at yourhome.gov.au/passive-design/sealing-your-home for more tips.
Before building or renovating
If you are building a new home or doing major renovations, then there are a few considerations. First, make sure windows can be opened when needed. Fixed windows look neat, but being able to ventilate a home naturally at will is an important requirement. And look for good arrangement of windows to provide good stack-and-flow ventilation.
The currently fashionable open shower cubicle is a big creator of mould in a home. Consider enclosing the shower cubicle or going further and fitting a shower dome (showerdome.com.au), which can all but eliminate steam-generated condensation in the bathroom, greatly reducing the need for an exhaust fan in that room.
On the same tack, the bedroom/walkthrough robe/ensuite configuration without doors can destroy a wardrobe of clothes, shoes and bags with mould. Have doors fitted between the ensuite and wardrobe, reconfigure the space or use heavy duty steam extraction methods as domestic extraction fans don’t remove all the steam fast enough.
Getting help
Basic draught sealing requires no special skills, but if you are new to the DIY scene, there are a few places that can help.
Most states have a government sustainability website with tips on improving the performance of your home, such as sustainability.vic.gov.au and actsmart.act.gov.au.
There are also many draught sealing projects on YouTube, which you can find via a quick search on ’draught sealing’. Be aware that anyone can make a YouTube video, so these may not show the simplest or best method. Channels created by commercial entities, such as Efficiency Matrix (bit.ly/2IHhgK6), This Old House (bit.ly/2XuYsBg), ecoMaster (bit.ly/ecoMasterYoutubeChannel), Green It Yourself (bit.ly/2H8HgeL and greenityourself.com.au) and even Bunnings (bit.ly/2Te2b6X), will feature the most reliable content.
If you aren’t able to DIY, then there may be businesses in your area that specialise in general draught sealing and similar maintenance. Look on the Yellow Pages or truelocal.com.au, or ask friends, neighbours or local ‘good karma’ networks for recommendations for a suitable handyperson or tradie. Your local council may also organise discounts for concession cardholders.
Just sealing up a home, without accounting for that improved airtightness, can cause problems. One issue is condensation, and its possible side effect, mould growth. Cool air can’t hold as much moisture as warm air, so as the air in your home cools overnight, it can reach the point where moisture can condense out onto cooler surfaces, such as windows and poorly insulated walls. Toxic gases can also build up in a well-sealed home. These include carbon monoxide from unflued gas heaters and gas stoves, and carbon dioxide from heaters, stoves and human respiration.
To reduce condensation problems, walls should be insulated and windows double glazed if possible. This brings the internal surfaces closer in temperature to the indoor air temperature so condensation is far less likely to occur. See the article in Renew 147 for more on condensation management.
Well-sealed homes also need some form of mechanical ventilation, especially in wet areas like bathrooms, to remove any build-up of moisture. In most homes, this will consist of nothing more than a good exhaust fan. Many exhaust fans are installed to just duct into the roof cavity, but this has the disadvantage of increasing moisture levels in the cavity and can cause condensation, with possible resulting damage from the dampness if the roof cavity is not well ventilated. All exhaust fans should be vented or ducted to the outside air if possible. You might also consider not sealing wet areas at all, but sealing them off from the rest of the home combined with using simple exhaust fans in those areas.
While you might think that running an exhaust fan or rangehood is the best way to remove toxic gases, in a very well-sealed home it is possible for the suction produced by exhaust fans to drag flue gases backwards down flues into the room, so, if your home is very well sealed, gas appliances for heating and cooking are best avoided—reverse-cycle air conditioners and electric cooktops are a safer option.
Going one step further than an exhaust fan, mechanical ventilation and heat recovery (MVHR) systems, and the related energy recovery systems (which also recover humidity), transfer heat between airflows into and out of a house. This allows adequate airflow through a well-sealed home to control humidity levels and indoor pollutants, while not greatly increasing cooling or heating costs. These can be a separate ventilation system, or part of a larger air conditioning system. For more information on MVHR, see the mini guide in Renew 147.
Carbon dioxide from respiration is less of an issue than that produced by gas heaters and stoves, but should still be kept below the recommended safe level of 1000 ppm. In the average home this shouldn’t be too much of an issue, but one regular Renew reader decided to check the CO2 levels in his home after he had started draught sealing work and found that levels regularly exceeded the recommended level, even in a not-so-well sealed home. For his experiences, check out www.bit.ly/2BlYRMF.
It’s a good idea to combine draught sealing with monitoring of humidity and indoor pollutants like CO2 to help you work out when to open up your home and whether you need an active ventilation system. As a home becomes better sealed, it may be necessary to regularly open windows and doors to the outside to flush out accumulated pollutants and water vapour, unless an active ventilation system is operating. Once you reach a very high level of sealing, below about 5 ACH50, you will need an active ventilation system such as an MVHR.
There’s much more in the full buyers guide! Find it in Renew 147.
The full guide includes 6 pages of how-tos on how to seal ‘fixed’ gaps, floorboards, appliances and chimneys. Plus what can renters do, and a list of suppliers of sealants and draught sealing products.
Warning: draughtproofing safety
Don’t undertake draughtproofing if you have an unflued gas heater or any open flued heater (see bit.ly/2CuI36Q) as, in a tightly sealed home, the gases from such appliances can present a carbon monoxide poisoning risk. With other gas appliances, special care needs to be taken including regular servicing and cooktop extraction to outside. See bit.ly/2MCUjEv
Read more buyers guides and articles on efficient homes
 All-electric
Hidden benefits of solar
In the maelstrom of claims and counterclaims that passes for debate over climate policy in this country, it’s easy to overlook the benefits rooftop solar can deliver, for households and the planet. Paul Barry explains.
Read more Climate change
Retrofitting for resilience in the Anangu Pitjantjatjara Yankunytjatjara Lands
Mia-Francesca Jones reports on a pioneering retrofit project in the APY Lands that is improving thermal comfort in remote homes, while helping inform the future of climate-resilient housing.
Read more Efficient homes
Inside two Sustainable House Day homes
Sustainable House Day is back in 2026, and on Sunday 17 May, neighbours across Australia are once again opening their doors. Here are two examples of homes where real people are sharing practical lessons about efficiency, affordability and climate-ready living.
Read more