

Going electric with hydronic heating
One year after converting from gas to heat pump hydronic heating, Peter Hormann gives us a full account of the upgrades at his family’s Melbourne home and how they are staying comfy and zero carbon.
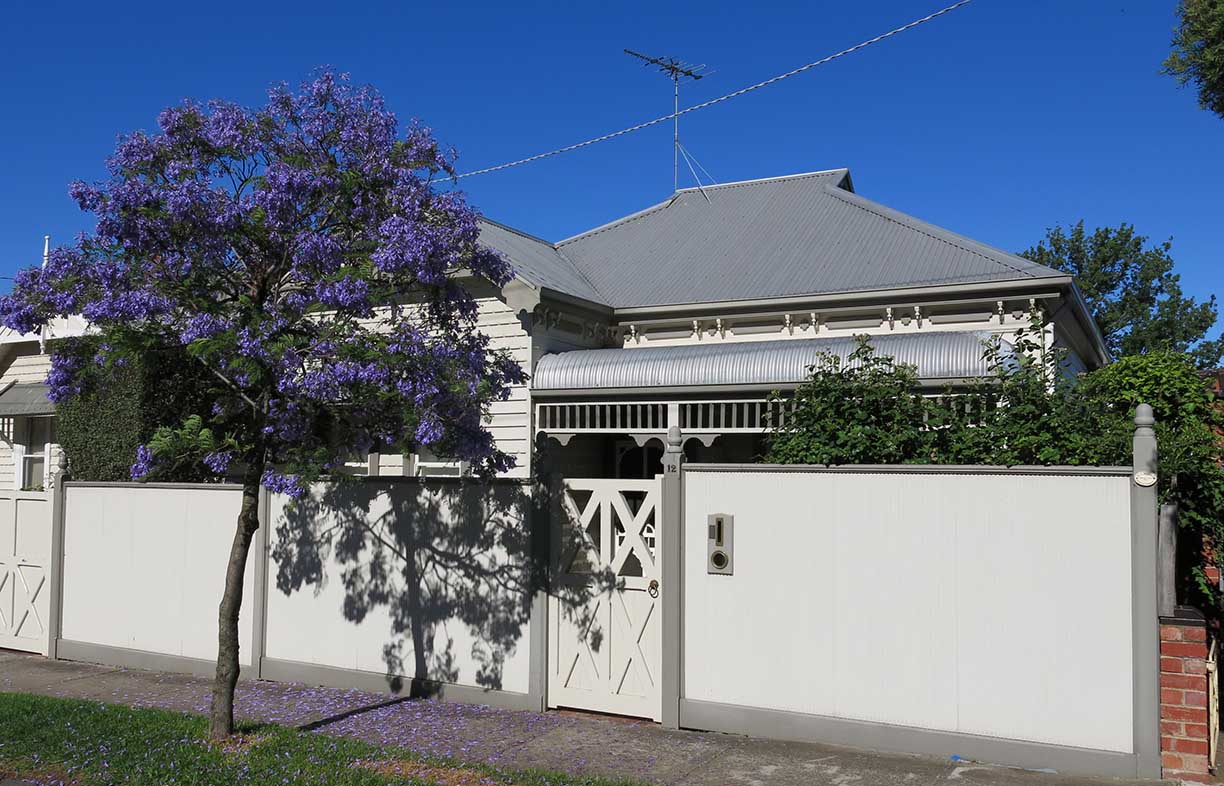
As an energy conscious family of three, we wanted to upgrade our 1908 Edwardian three-bedroom weatherboard home in Melbourne to be zero carbon for energy. We’ve achieved this by upgrading from gas to heat pumps for our heating and hot water, installing solar PV and buying 100% GreenPower. Here’s what we did and what we learnt.
Evaluating efficiency
The previous owner had renovated our house in the early 1990s. They added a flat-roofed rear extension, wall and ceiling insulation, gas hydronic heating, solar hot water with gas boost and a 7 kW air conditioner. They also removed the old chimneys and fireplaces, restumped and rewired. And, as befit the times, halogen downlights were almost everywhere.
The Archicentre property report we got before we purchased the home in 2008 identified some minor structural issues, but made little reference to building energy performance. Once we moved in, we found quite a few such problems.
These issues included a lack of insulation on the below-floor hydronic heating pipes, limited draught sealing—found by listening for shaking closed doors on cold windy days, then using a ‘back of hand’ test to find the source—and poor cooling effectiveness from the 20-year-old air conditioner; inefficient to start with, it had lost much of its refrigerant gas.
We began by replacing the halogen lights with LEDs, keeping the original fittings and transformers, and embarked on a spree of draught sealing around windows, doors, exhaust fans and more hidden locations such as behind cupboards and around the bath. We also serviced the hydronic gas boiler (which had a controller fault) and replaced the air conditioner with a Daikin multi-head 9 kW cooling-only unit servicing the living area (7.1 kW) and three bedrooms (2.5 kW each). The multi-head outdoor unit fitted in the footprint of the old outdoor unit and saved us about $2000 compared to four separate split systems; buying ‘cooling-only’ saved another $500. In retrospect, a reverse-cycle unit would have been useful for individual room heating, especially during shoulder seasons.
We also replaced four windows with double-glazed Miglas wood-aluminium windows as the old frames had rotted due to hidden roof leaks in the newer rear extension.
Opportunities and challenges
With those changes in place, it was time to really address energy efficiency. For us, reducing household operating costs was important, but secondary to doing our part to tackle climate change. A key aim was to convert our gas hot water and heating systems to electric heat pumps, ideally achieving zero carbon emissions for energy.
We really like the warmth and comfort of hydronic heating, and also wanted to retain the system’s sunk costs in radiators and copper pipework. Our decision to continue to use hydronic heating was essentially made prior to this when we upgraded the air conditioner to a cooling-only system.
However, we were uncertain about the viability of using a heat pump instead of a gas boiler in our hydronic system. Would the existing radiators effectively heat room spaces at the lower operating temperatures of a heat pump hydronic system (typically 55 °C to 60 °C compared to 70 °C for our gas boiler)? So we conducted a test in the winter of 2016: we reduced the gas boiler’s maximum temperature to 55 °C to see whether that would meet our needs. And it did—we found that it performed quite acceptably, just with a slower response to heating demands. We used ceiling fans (turning slowly in reverse) to improve warm air circulation and room heating time.
Another issue was the tight access beside our home to remove the old gas boiler and install the heat pumps. Happily, we were able to gain access through our neighbour’s property; the only other (quite expensive) alternative would have been to temporarily remove one of our water tanks. Such issues are not always thought through before deciding on a course of action, but can add a lot to the cost and difficulty!
One of our biggest challenges turned out to be removing the faulty solar hot water panels and close-coupled tank from the roof, due to the weight, height of installation on a sloping roof and the equipment nearby at ground-level (gas boiler and water tank). Overhead street wiring meant the use of a crane was not practical. Fortunately, the panels and tank could be unbolted into one 130 kg and two 75 kg parts and we were able to carefully slide these off the roof and lower them down using a complex pulley and rope system tied into the rafters of the house. Managing individual safety, including my own, was paramount!
Industry experience (and interest) in decommissioning the solar hot water system seemed to be limited; many did not want to even consider it, or tried and quickly gave up. A response of “Why not just leave it up there?” was common. In the end, removing the solar hot water system required help from three parties who continue to work together: the hydronics system professional, a plumber, and our solar PV installer. Their cooperation beyond their commercial areas of interest was invaluable.
What we did next
Step 1. Switchboard expansion
Cost including labour and parts $3200.
We upgraded our switchboard from 16 to 24 modules and installed wiring for the three heat pumps (two for the hydronic system and one for hot water). This provided switchboard space to also connect a solar PV inverter and, in future, an induction stovetop/oven and EV charging point.
Step 2. Gas hot water system removal and heat pump hot water installation
Cost including equipment, labour, delivery, parts and project management fee $3100 (including the STC rebate).
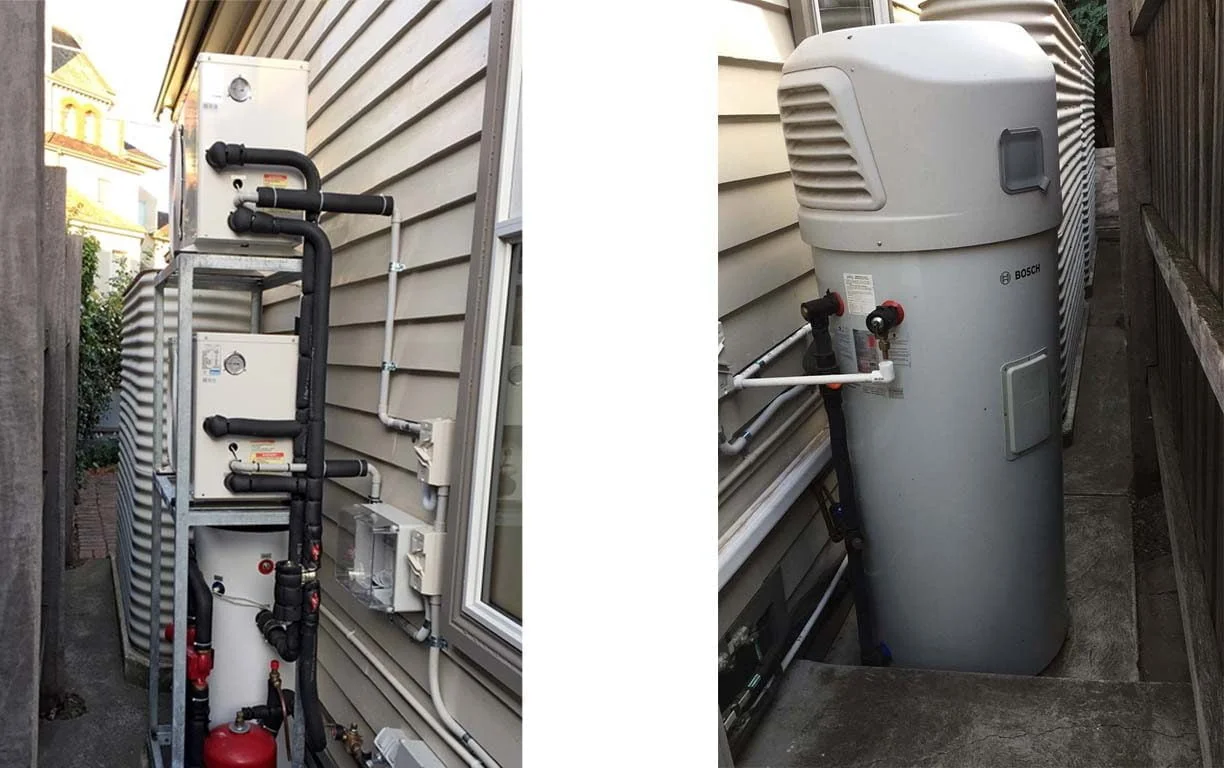
The plumber contracted to install the hot water system also committed to remove the solar hot water panels and tank. With permission from our neighbour, a fence section was temporarily removed and the plumber installed a Bosch Compress 300 L integrated heat pump and tank with little difficulty. The old gas hot water booster was uninstalled and the solar hot water panels and tanks disconnected. With just the unmounting of the solar hot water system remaining, the plumber promised to return the next day; unfortunately we never saw him again (he moved interstate apparently!).
Step 3. Solar PV installation
Cost including equipment, labour and parts $10,400 (including the STC rebate).
For our solar PV system, we chose Elite Solar Pro based on a neighbour’s recommendation. They installed 27 Trina TallMax 330 W 72-cell panels totalling 8.6 kW, paired with a Fronius Primo 8.2 kW inverter.
The panels are installed at a 10-degree incline to maximise the use of the rear flat roof space while avoiding wintertime overshadowing between the panel rows. A closer to horizontal panel array also maximises the capture of dispersed solar radiation on cloudy days, and has the added bonus of providing roof shading from the hot summer sun. A Solar Analytics monitoring device was included, the source of much of the data in this case study.
Step 4. Gas hydronic boiler removal and heat pump hydronic installation
Cost including equipment, stand, buffer tank, labour, miscellaneous parts, delivery charges and project management $14,000.
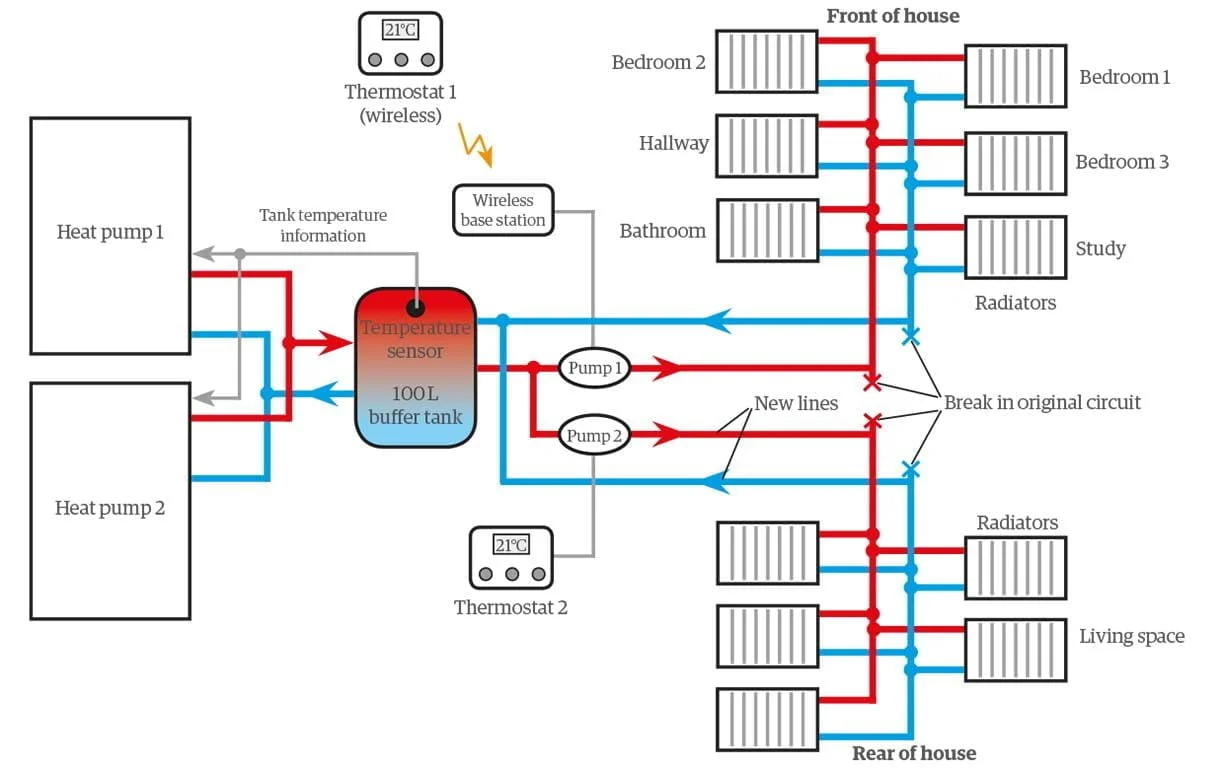
Working with Chris Siddons (whose company is now HydroSol), we designed a hydronic heating solution based on two 5.5 kW heat pumps (COP 3.26) for a total heating capacity of 11 kW. This was a substantial reduction from the old 37.8 kW gas boiler, sized to heat the whole (draughty) house with estimated system losses of around 30%.
To reduce the required heating capacity, we installed a 100 L buffer tank maintained at 55 °C by the heat pumps. This enables a faster system warm-up when the hydronic water circuits are turned on; a larger tank might be better, but would mean increased standing losses. We also split the single large hydronic circuit into two separate zones, so the instantaneous heating demand can be halved or staggered (one zone is heated, then the other is added). In addition, not all rooms need to be heated all the time (e.g. the spare bedroom) and these can have their radiators turned off with doors kept closed. As per our testing, we programmed the system to start earlier; the warm-up simply takes longer with less overall system heating power.
As a trial, for winter 2019 we’ve increased the buffer tank temperature from 55 °C to 57 °C to see how this affects system warm-up time. This may increase energy consumption and tank standing losses so we’ll be monitoring the results compared to 2018.
Step 5. Insulation of pipework
Cost including labour and parts $1050.
The sub-floor hydronic copper piping was essentially uninsulated with just a thin protective green rubber sheath. We used about 100 metres of K-Flex ST lagging tube to insulate the piping connecting the wall-mounted radiators. While it was a difficult and cramped underfloor effort shared by the plumber and me, it was made easier by the pre-splitting and peel-off sticky seam sealing of the K-Flex tubing.
Step 6. System programming
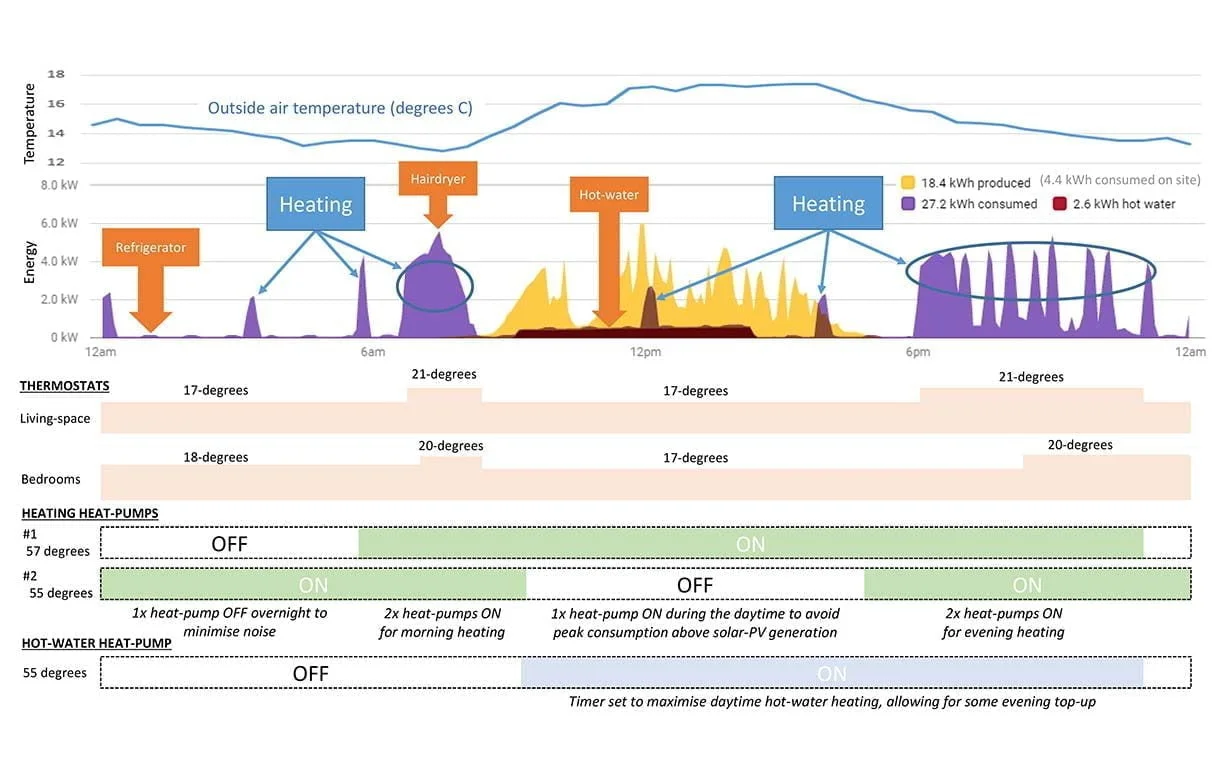
Figure 1 is an example of a typical autumn day (13 May 2019). It’s a weekday, so the early morning and late afternoon/evening thermostat programming coincides with when we are active at home versus when we are sleeping or out and about. Weekends use a similar program, but if we are home we adjust the daytime comfort temperature via the thermostat.
The hot water heat pump is programmed to maximise use of our solar PV generation during daylight hours. We occasionally need to override this when there’s been significant evening hot water use such as a long hot bath.
The hydronic heating heat pumps are separately programmed both to reduce daytime demand that may peak above solar generation and to minimise overnight noise. Two heat pumps working together are required when the system needs to lift zone temperatures from a lower standby temperature (e.g. 17 °C) to a higher comfort temperature (e.g. 21 °C).
Results
Generation and consumption
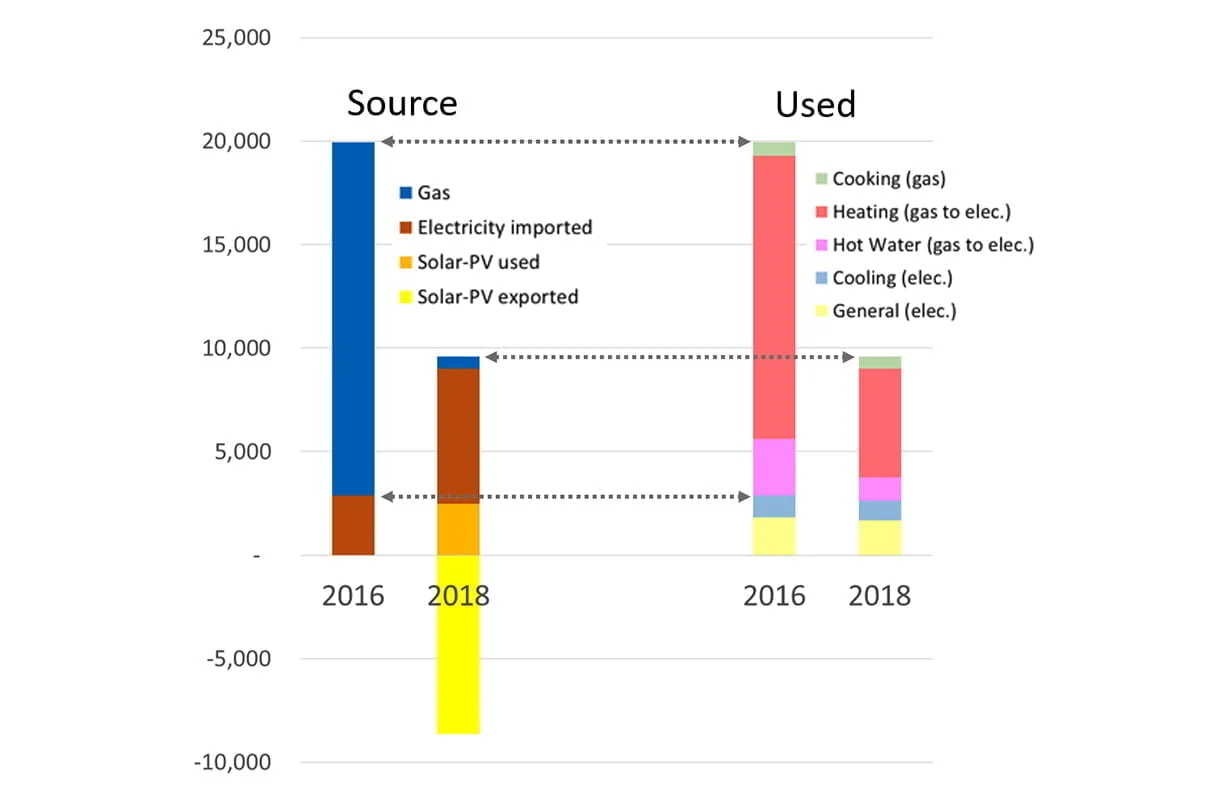
Figure 2 shows our 2018 monthly and daily solar generation and consumption. We have an excess of solar generation in the summer and shoulder seasons, but the opposite in winter. Unfortunately, our heating demand is seasonally counter to our solar generation.
Based on data from our Solar Analytics monitoring, the total solar generation for 2018 was 11.2 MWh, of which 2.4 MWh was consumed on site. The total energy imported from the grid was 6.6 MWh. For comparison, our 2016 electricity usage was 2.9 MWh.
Our gas consumption in 2016 was 17 MWh (62 GJ) for gas cooking, hot water and heating. In 2018, our gas consumption was 0.6 MWh (2.1 GJ) for our gas cooking requirements.
Unsurprisingly, our electricity usage has increased, but pleasingly our total energy consumption has more than halved; see Figure 3. I’ve included an estimated breakdown of electricity and gas usage into heating, cooling, cooking, hot water and other. I estimated this by looking at variations in usage over the year, assuming cooling is used from December to March, heating is used through winter and some of autumn and spring, and hot water, cooking and general electricity use is all year round.
Costs
Our combined electricity and gas energy consumption has more than halved (2016: 20 MWh down to 2018: 9.6 MWh), but our energy costs (without the FiT) have remained about the same (allowing for increases in energy tariffs over that time)—2016: $2594, 2018: $2875. This is because of the comparatively low cost of gas (7 c/kWh) versus electricity (25 c/kWh) in Victoria. Of course, deducting the FiT credit, our actual bills are lower now—in 2018 by $1060 (with a FiT of 11.8 c/kWh).

Greenhouse Gas (GHG) emissions
Gas is currently rated at about 20% of the emissions of Victorian electricity which is predominantly from burning brown coal (0.19 kg-CO2e/kWh vs 1.08 kg-CO2e/kWh, National Greenhouse Account Factors 2017). If we hadn’t purchased 100% GreenPower and used our own solar-generated energy, our household GHG emissions would have increased by 50% (6.3 to 9.8 tonnes-CO2e) per year, despite more than halving our energy consumption.
But note that the factors I’ve used don’t include extraction, generation, fugitive and network distribution losses which would increase total carbon emissions by approximately 10%. [Ed note: In addition, there is likely underestimating of gas emissions from network leakage, fracking and other practices; see article on p. 40 for more.]
Also, a key point of an electric-powered house is the ability to choose your energy generation source (default grid power or 100% GreenPower) and to generate your own clean, green energy. And our national electricity generation mix gets greener every year as the percentage of renewable generation increases, even if you don’t buy 100% GreenPower. [Ed note: When going all-electric, emissions reductions are possible even without solar or GreenPower, along with lower costs, if using higher efficiency reverse-cycle air conditioners for heating as per Renew’s reports and case studies; for example, see bit.ly/GVEYHPG, bit.ly/Renew_TH and p. 40.]
While one could argue that gas can be carbon offset, this is a bandaid solution to an ever-growing emissions reduction challenge and the offsets could be better used elsewhere in the economy.
With the use of solar PV and the purchase of 100% GreenPower and carbon neutral gas, our household is technically carbon negative due to our net energy export—we are displacing the carbon emissions equivalent of 1.9 t-CO2e of fossil fuel generated electricity. But it should be noted that, under the rules of the National Carbon Offset Standard, the sale of our small-scale technology certificates (STCs) effectively means the carbon offset benefit of our exported solar energy is not ours, but rather shared with all Victorian electricity users.
On reflection
Our lived experience shows that it is possible to upgrade a 110-year-old house to be a net energy generator and zero carbon. We’ve now had more than a year in our largely electric home; importantly, we are cool in summer and warm in winter despite the home’s poor thermal mass.
At the same time as making our home carbon neutral for energy use and helping to green the electricity grid for others, we’ve reduced our energy and maintenance costs and, optimistically, perhaps increased the property’s resale value.
The system upgrade cost just under $30,000, with about half ($17,100) for the heat pump heating and hot water. Gas equivalents and the cheaper labour for a like-for-like swap might have cost about half this, say $8000. But ongoing maintenance costs should be lower and a like-for-like heat pump replacement will also be less costly if needed in the future. We see the capital investment as small, when you consider how much people spend on kitchen (say $30k) and bathroom (say $15k) renovations that offer little or no operational savings, let alone environmental benefits.
Finally, there’s always more to do. We’ll keep looking for sources of draughts, replace our gas stove/cooker with electric induction and, finally, disconnect the gas supply (and celebrate!). We’re also planning an electric vehicle with home charging when our current hybrid is due for replacement.
 Efficient homes
Building for a changing climate
Are we building homes for the future, or for the past? Rob McLeod investigates how climate change is impacting home energy ratings and the way we build our homes.
Read more Reuse & recycling
Recycled hydronic heat
Renew’s sustainability researcher Rachel Goldlust gives us a view of and from the Salvage Yard.
Read more Efficient homes
Getting off gas FAQs
Do heat pumps work well in Australian conditions? Rachel Goldlust explains.
Read more