

Solar on a shady roof
For years, Jay Banyer thought his home’s roof was too shaded for solar. But with the help of the latest technology, he’s been able to become a net energy exporter. Jay explains.
Some years ago I was told that our roof was too shaded to get solar. This article explains how, given advances in solar equipment, I analysed the impact of shading and was able to justify going ahead with solar. It also describes the results, one year down the track.
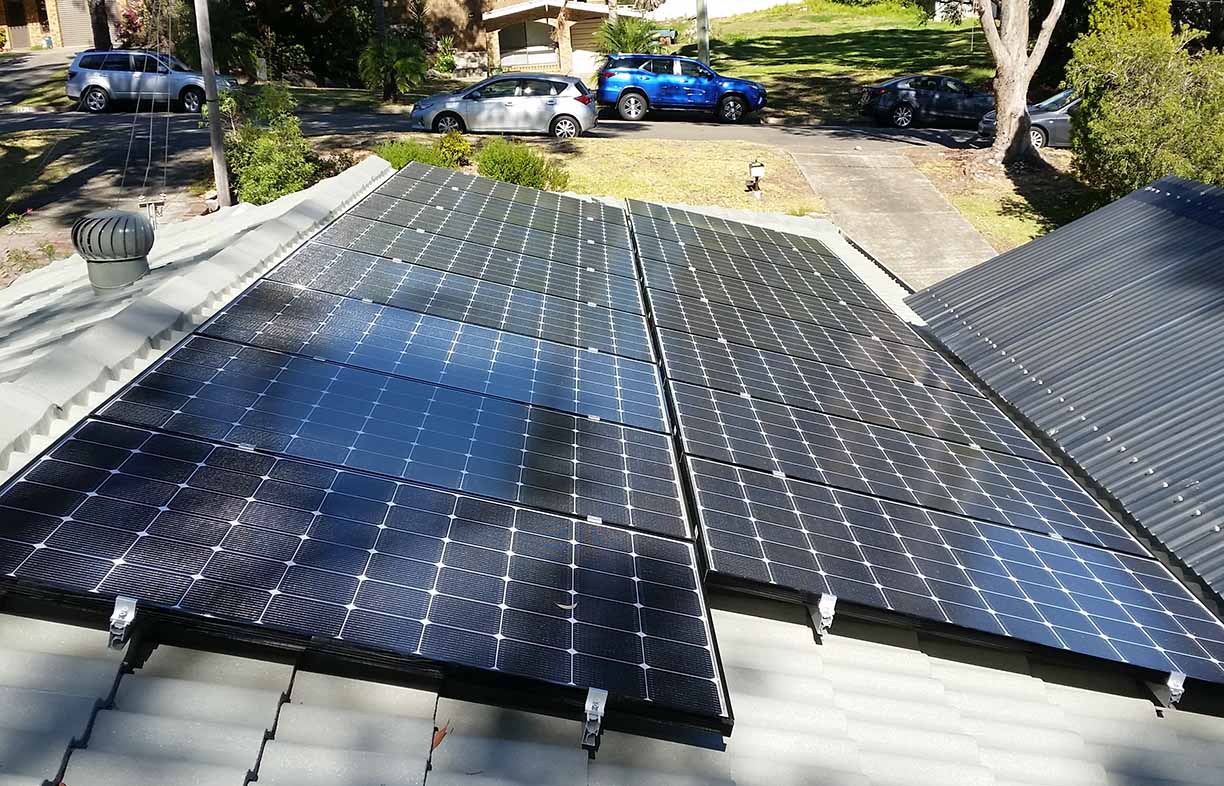
Like many living in the Sutherland Shire, I’m lucky to live in a home surrounded by large gum trees. We love the trees but their shading of the roof posed a question about the feasibility of installing solar. Our house is aligned roughly north–south, with the large roof areas facing east and west. In the middle of winter, the roof is almost fully in shade from a row of trees to the north (plus trees to the east and south), but for six months around summer it is almost fully in sun.
Solar installer says no
About eight years ago I walked into the office of a local solar company and made a casual enquiry. The guy behind the counter entered my address into Nearmap, an online service that provides high-quality, recent satellite imagery to paid subscribers such as solar installers. Using this tool he looked at images of my roof from different times of the year.
“Bad news,” he said. “Too much shading. You can’t get solar. Sorry.”
When someone who makes their living selling solar refuses to sell you solar because of shading, you tend to listen. So I walked out disappointed, but resigned to the fact that we couldn’t get solar.
Tech options for shaded roofs
Fast forward to 2016 and I started hearing about microinverters and DC optimisers, and how they can help when there’s shading on your solar panels. There was also discussion about the advantages of west-facing arrays (which would suit our roof), as their generation may be skewed to the late afternoon, useful on those scorching summer days when everyone gets home from school or work and cranks up the air conditioner. This timing also coincides with peak electricity tariffs for those on a time-of-use tariff.
We’d also had a tree removed from the southern end of the house. This tree had caused some shading during summer.
So I started thinking: maybe we can get solar. But how do I know if it’s worthwhile?
Environmental motivation
Our household’s main motivation is environmental. Economics are secondary, although still interesting of course. We are primarily interested in how much total energy (measured in kilowatt hours, kWh) a system would produce each year. Every kWh produced by rooftop solar displaces one kWh of predominantly coal-fired energy from our grid, assuming it’s self-consumed or exported to the grid.
If a system on our roof produced a total annual output of, say, 50% of an unshaded array in the same position, is that enough to justify going ahead?
Studies have shown that the energy payback period for solar panels is around one to three years. This means it takes one to three years for a solar panel to generate as much energy as it took to manufacture that panel. A system with output reduced by shading to 50% would take two to six years to repay the energy used to produce it. Since solar panels should last 20 years, it seems to add up environmentally.
So the question became: how do I work out how much the shading will impact the output of a system on my particular roof?
Estimating the shading impact
First, I started taking photos of the roof at different times of the day and in different seasons. It turns out that it’s difficult to remember (not to mention inconvenient) to take a photo every two hours on one day every month for a year—so my dataset was incomplete. But I managed to take quite a few photos during the six months around summer and they all showed very little shading. This gave me hope.
Then, I tried setting up a GoPro on the garage roof pointing at the house and taking a time-lapse movie, like the ones you see on natural history documentaries. After it sat up there for an hour doing its thing, I realised that the camera was going to be in full sun for the whole day, probably not a camera’s favourite environment. So I gave up on that approach.
I then heard about a device that some installers use to check the shading at a site, called a SunEye. This device takes a whole-sky image using a fish-eye lens, which can be transferred to a PC and analysed with special software to provide an estimate of the amount of sunlight that will reach the observation point over the year. But it’s an expensive device and not all installers use them.
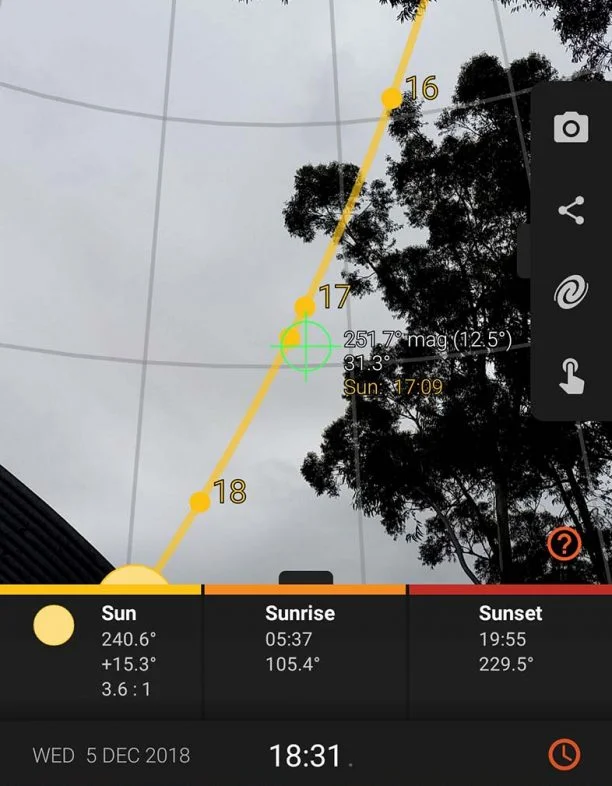
An installer told me about smartphone apps that do a similar job, so I bought Sun Surveyor for $10.99 and got up on the roof. After several minutes of waving my phone in a large figure eight to calibrate the compass (the neighbours must have been curious what I was up to), I got something like in the image top right.
You can enter any date into the app and it will display the track of the sun over the image on the screen. By moving the phone along that track of the sun, I was able to estimate the number of hours the sun was behind a tree on any given day. I did this for one day of each month of the year, giving me a ‘shading factor’ for each month.
I then obtained the expected output by month of a 5 kW array for my location and roof orientation (from the excellent PVWatts site) and scaled it by my shading factor to estimate the output with shading on my roof. (Ed: You could also use Renew’s Sunulator.)
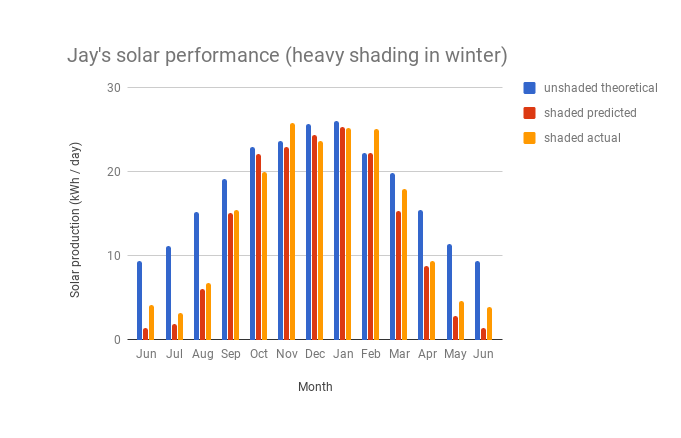
In Figure 1, the blue bars are the theoretical output of an array with no shading and the red bars are the predicted output of an array on our roof with shading considered. Note the severe shading impact around June; fortunately, that’s when solar output is lowest anyway.
The calculations predict a total annual output of 75% compared to an unshaded array in the same position (west-facing), and 70% compared to an unshaded north-facing array. Given that a system with 50% output still makes sense from an environmental perspective, that was good enough for us.
Our household joined Sunny Shire’s first bulk buy. Since we have shading issues we chose the premium SolarEdge inverter with SolarEdge DC optimisers on the panels (see box on the next page for more on shading and optimisers). Since the unshaded roof area is limited, we chose higher output (330 W) premium LG NeON 2 panels to optimise output per panel. With 16 panels (total of 5.28 kW) and the inverter, the installed cost was $8750 (mid-2017).
Summer is awesome, winter is depressing
Overall, the system production has slightly exceeded my predictions. Over a year, the system produced approximately 80% of the output compared to the theoretical output from an unshaded system in the same position. My prediction was for 75%.
In summer our system cranked out over 30 kWh on sunny days. This far exceeded our household consumption of under 10 kWh and we managed to supply almost 70% of our consumption directly from the solar. We only imported 2 kWh to 3 kWh per day from the grid, most of which was overnight.
The shoulder months (Sep to Oct, Mar to Apr) were pretty good, with over 50% of our consumption provided by the solar directly.
Winter was a different story. The row of trees to the north caused heavy shading and, for the four months from May to August, the system produced just 3 kWh to 5 kWh per day and was only able to supply about 15% of our consumption directly. It was almost like we didn’t have solar at all, at least compared to the summer months. It’s also the time of year when our consumption increases substantially due to heating.
Economics
Without solar our bills would have been about $1500 for the year, given our fixed-rate tariff of 26c/kWh inc GST. With solar and a feed-in tariff of 12c/kWh, the total was about $600, so we saved about $900 for the year. For six months of the year we were in credit due to solar exports. But in winter the solar doesn’t help much and our bills ($145/month) were fairly similar to before we got solar ($180/month).
A saving of $900 per year gives a payback period of about nine years for our system. The majority of households should do better economically; we have such heavy shading for four months of the year and our system was relatively expensive due to premium components. We are also a low-electricity consumption household, so we have less opportunity to save in the first place.
To save more, we could switch to a higher feed-in tariff (FiT); for example, AGL’s Solar Saver plan has a 20c FiT, which would save us an extra $200 per year. We also recently bought an electric car and if we charge during daylight hours at least some of the time, this would improve the economics of our solar.
Net exporters of clean energy
Overall we are super-happy with our decision to go solar, despite the shading issues. We (and the environment) are receiving about three-quarters of the benefits compared to if there was no shading. The system produces more energy per year than our household consumes, meaning our household is a net exporter of clean energy. Our financial payback period is about nine years, which is longer than most households, but we will still save money in the long run.
Since this analysis, our installer has also reconfigured the optimisers so that the system performs better—we’d noticed situations where, if too many panels were shaded, the unshaded panels produced less than a quarter their normal output. The reconfiguration means somewhat improved solar generation during the weeks when the array is roughly half shaded.
Shading analysis is not easy, and it’s important to plan carefully and have realistic expectations if you are considering installing solar on a partially shaded roof. Many roofs would experience more shading than ours and for them solar may not make sense. Solar installers find shading a tricky issue because it is difficult and time-consuming to estimate production like I did, and they don’t want a disappointed customer. But if your roof is mostly unshaded for most of the year, then solar may be a reasonable choice for you too.
Optimisers and shading
In a shaded solar system without optimisers, the inverter still does its best to harvest as much energy as possible from the solar array. For any panels in shade, their internal bypass diodes may be ‘on’, bypassing the part of the panel that is in shade. This is done to protect the shaded panel from excessive heating, but it also improves the shaded panel’s output and can reduce the shading’s effect on the rest of the array. Panels usually have three strings of cells and three diodes, so that partial shading doesn’t cause the entire panel to stop producing. However, each part of a panel that is bypassed produces no voltage, so a heavily shaded array can drop below the input voltage allowed by the inverter, causing the system to stop feeding power to the grid. Also, sometimes there isn’t enough shade on a panel to cause any of the diodes to activate, so the entire array is limited to the reduced current that can flow through the shaded panel. This is where optimisers come in.
With on-demand optimisers, such as the Tigo units, you use an optimiser on each panel (or on each panel likely to be shaded) paired with a regular inverter. When a panel is partially shaded, the optimiser boosts the voltage so that even partially shaded panels produce enough voltage to keep the system operating. They also maximise the current from the unshaded part of the array by allowing some of the current from unshaded panels to bypass the shaded panel, so that all the power from the unshaded panels can be harvested (some current from the unshaded panels still flows through the shaded panels, as the shaded panel’s output doesn’t drop to zero). Optimisation only occurs when one or more panels are shaded, so for much of the day the optimisers are not doing any power conversion which could mean they have a longer life. Advantages with this type of optimiser include that you can use a conventional grid-interactive inverter of your choice, although there will usually be recommended brands suggested by the optimiser manufacturer. Also, if only a few panels in a string will ever be shaded, then only those panels will need an optimiser, which can reduce system costs.
Always-on optimisers, such as the SolarEdge units, work differently in that they do all of the maximum power point tracking (MPPT) rather than this being done by the inverter. They are usually paired with a grid-interactive inverter from the same manufacturer, with the inverter itself having no MPPT ability. This means that every panel must have an optimiser fitted, even if it is never likely to be shaded. In these systems, the optimisers are working all the time. An advantage is that, because the optimisers and inverter are working together as an integrated system, per-panel monitoring and control is possible, with any weak panels or other problems showing up in the monitoring software as soon as they occur.
A recent development is embedded optimisation. This involves replacing each bypass diode on the solar panel with a power optimiser IC. So far, only Maxim Semiconductor manufactures such a device, and several solar panel manufacturers now produce ‘Maxim optimised’ panels. Each panel contains three optimisers, so the optimisation is at a level greater than with external optimisers. The potential disadvantage with such a system is that a catastrophic failure of one optimiser IC could render the whole panel dead. There have also been some problems with Maxim-optimised panels causing TV interference and at least one manufacturer, Jinko, has dropped their Maxim panels for the Australian market.
With microinverters, each panel becomes its own independent solar system and operates to maximise its output regardless of the output of the other panels, and thus they reduce problems from shading. They also do the DC to AC conversion at the panel, so the output of each panel is mains voltage AC. This makes for simple cabling as it uses standard mains wiring and eliminates the need for a DC isolator on the roof, the most common cause of solar array fires in Australia. However, if a battery is to be integrated into a system, it must be an AC battery, with an AC-DC-AC converter built in, such as the Enphase AC battery, or a separate grid-interactive inverter will be needed. This adds somewhat to system costs as well as energy losses.
Related articles
 DIY
DIY
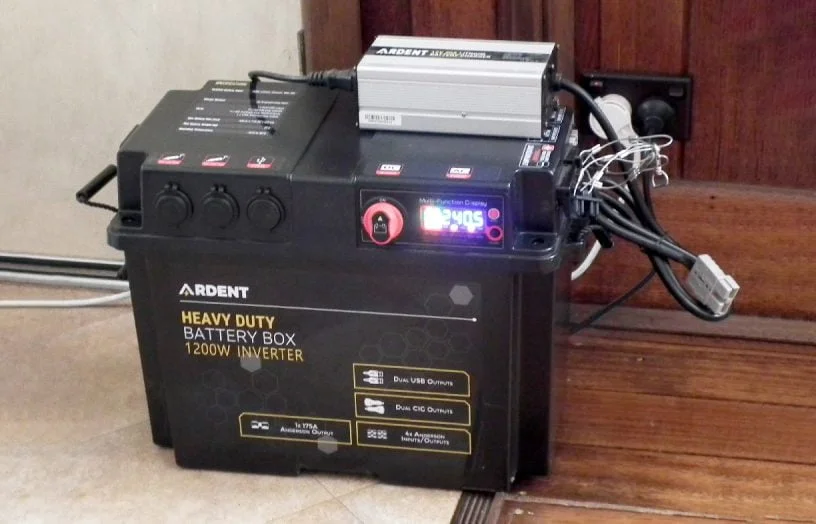
Deleting the genset
If you have the need for the occasional use of a generator, then why not replace it with a much cleaner battery backup system instead? Lance Turner explains how.
Read more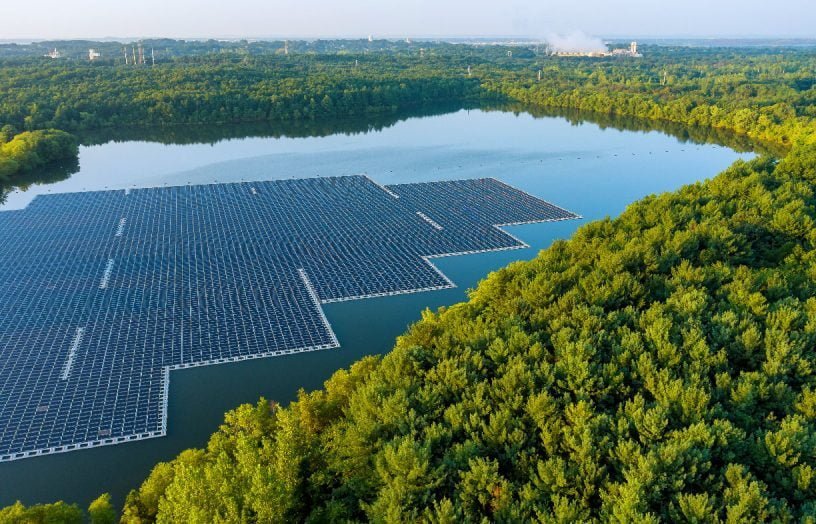 Renewable grid
Is a floating solar boom about to begin?
Rob McCann investigates the world of floating solar energy systems.
Read more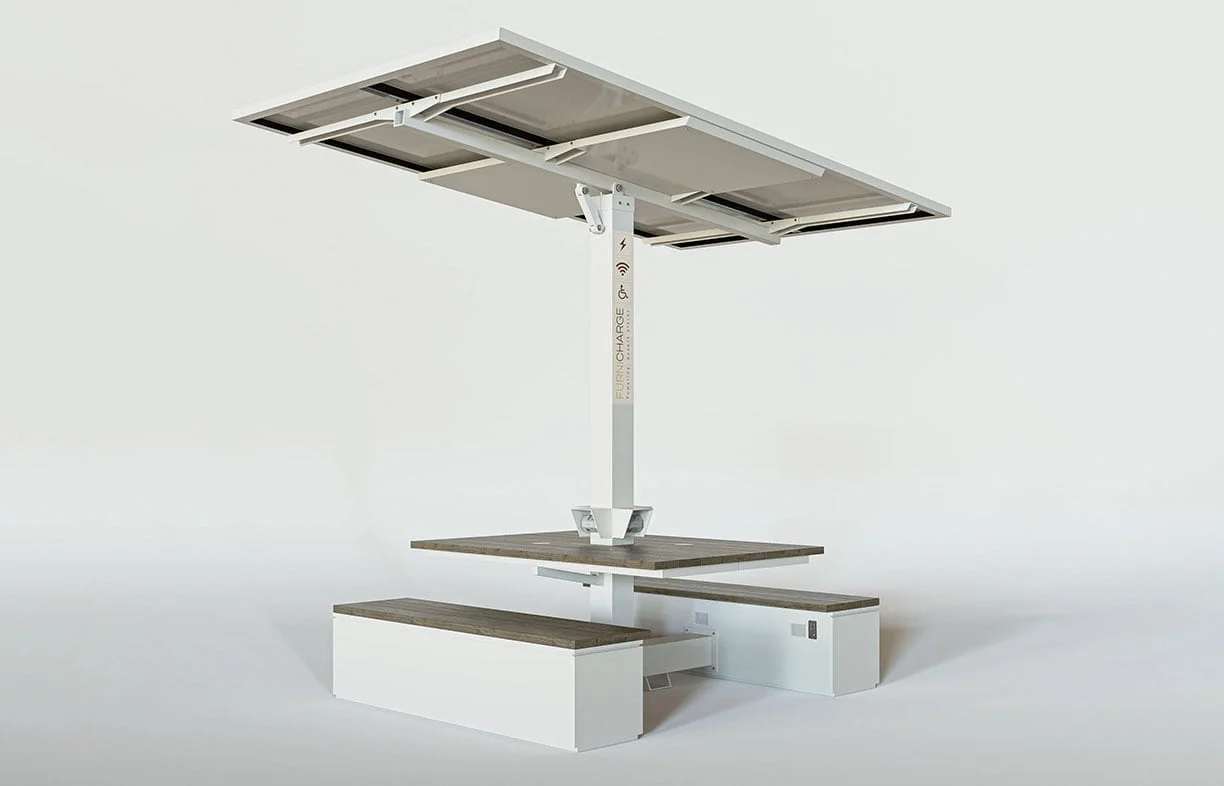 Products
Product profile: Portable solar recharge hubs
Providing device recharging for events or outdoor areas with no access to electricity can be difficult, but the Furnicharge Freedom Hub makes it simple.
Read more