
From earth, cans and tyres: Earthship Ironbark
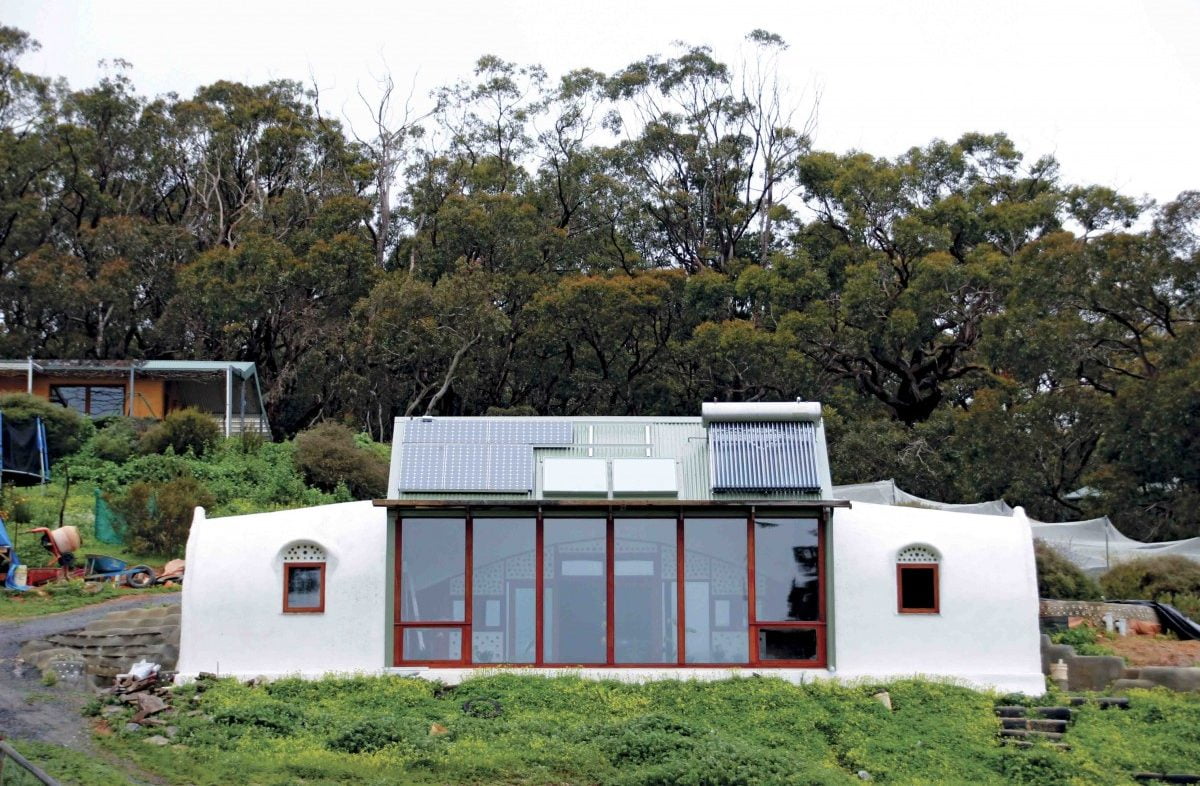
It took a few years, but Australia’s first permitted earthship has set sail in its new life as B&B accommodation, and as a living laboratory. Owner-builder Martin Freney describes the voyage so far.
As 2015 comes to a close, it’s been three years since I first wrote in Renew about my earthship research and my own building project in Ironbark, in the Adelaide Hills. In that time, I’ve completed my PhD looking at the environmental impacts of earthships compared to other forms of building and living, and Earthship Ironbark is almost finished.
The exciting news is that Earthship Ironbark has become the first permitted earthship in Australia, with planning approval granted three months after submission (the only design tweaks needed were the addition of exit lights and outward opening doors, as these are required for a B&B) and building approval granted in six weeks.
The one thing I couldn’t get approved was the wastewater system, which includes irrigating food with greywater and flushing the toilet with biologically treated greywater. The greywater system was constructed but not commissioned – this will be done at a later date if I can influence the laws on this to be changed (fingers crossed).
I enlisted a crack energy assessor who knew how to convince the ratings software to predict the performance of a home with earth tubes, a greenhouse and many tonnes of earth piled up around its earth-filled tyre walls. The result was a 6.3 Star rating, but in reality I believe the home will be 9 or 10 Stars and I’m going to try to prove it…
What is an earthship?
The invention of US architect Michael Reynolds, an earthship includes passive heating and cooling, natural and recycled or reused construction materials, off-grid renewable energy, rainwater collection, on-site wastewater treatment/recycling using biological methods, and food production, generally using wastewater.
The overall aim is to create a highly self-sufficient home that provides its own services so that it is not reliant on the polluting infrastructure that conventional homes rely upon. It should passively provide comfortable indoor temperatures and aim to use low embodied energy materials.
Furthermore it aims to be affordable. Reynolds claims that an earthship costs about the same as a conventional home to build, yet the savings on electricity, water and sewage bills over the earthship’s lifetime are substantial. Owners need a savings plan to replace system components such as batteries, but this should be more economical than paying for the same services from the grid. Another key principle is that it uses simple construction methods which enable the owner (plus friends and family) to get involved in the construction of their home.
A living laboratory
I intend the earthship to be a living laboratory yielding new knowledge about sustainable housing. It’s going to be a B&B, giving me the opportunity to survey the many different occupants about living off-grid, with questions such as – was it comfortable, were they concerned about running out of power or water, did they have to change their behaviour and what would be needed to get them to commit to their own off-grid eco-change?
It’s also wired up to collect data. It has temperature sensors buried in the roof, in the berm, under the main floor and under the greenhouse floor to provide a better understanding of how heat flows through tyre walls and earth-bermed structures in general. These will also let me check the energy rating.

Adelaide climate tweaks
There were some design changes I made to adapt the earthship design to the Adelaide Hills in climate zone 6 (mild temperate), a very different climate zone to Taos, New Mexico, where the earthship design evolved. Taos has extremely cold winters (-20°C) and, compared to Adelaide, mild summers (35°C maximum), with summer nights usually below 20°C. In Adelaide we often suffer from very warm nights when it’s impossible to use cool night-time air to cool our homes by opening the windows. We also have overcast winters, whereas in Taos they are blessed with abundant winter sunshine, essential to the passive solar functioning in the otherwise bitterly cold conditions. The winter sunshine also means they can use relatively small PV arrays and battery banks.
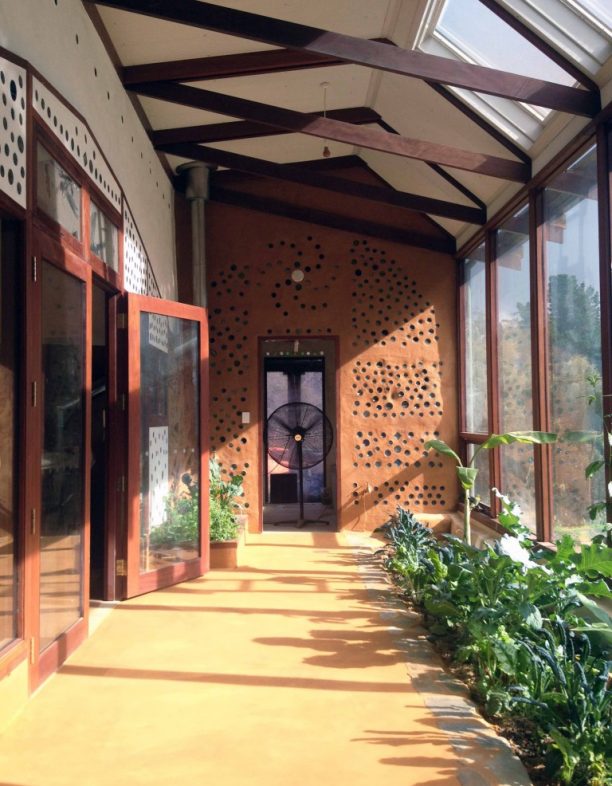
To allow for this, I increased the area of north-facing roof so that I could fit a larger solar PV system as well as a solar hot water service (24 evacuated tubes, close-coupled with the roof-mounted tank). With a 24V, 600 Ah battery bank and 65% DOD, this gives almost three days of autonomy for my predicted usage of 3kWh per day. The roof also incorporates two double-glazed operable skylights to regulate hot air venting out the greenhouse roof (similar to Reynolds’ roof vent boxes, but more elegant to my mind). I may install internal blinds to block summer sun, but I am anticipating that it will be important that the greenhouse heats up sufficiently to cause a natural thermal convection cycle to draw air through the earth tubes for natural cooling.
Many earthships feature angled glazing which minimise heat loss and maximise heat gain. Double glazing is quite expensive (I paid about $220/m² for argon-filled 5/10/5 double-glazed units, installed) and angling it to maximise winter solar gain means you need less glass for the same winter performance, thus saving money. However, angled glazing could lead to excessive heat gain in Adelaide’s harsh summer sun as well as complexity in construction: it may void the warranty as it can tend to sag and be more prone to breakage.
My approach was to try a bit of everything: I have a small area of angled glazing (the skylights) which can be easily shaded if necessary. These let winter sunlight deep into the main room to warm the thermal mass floor and walls. I have also made provision for a shade structure, with roof beams extending past the glazing to be used to train deciduous vines on high-tensile wires.
Earth tube cooling
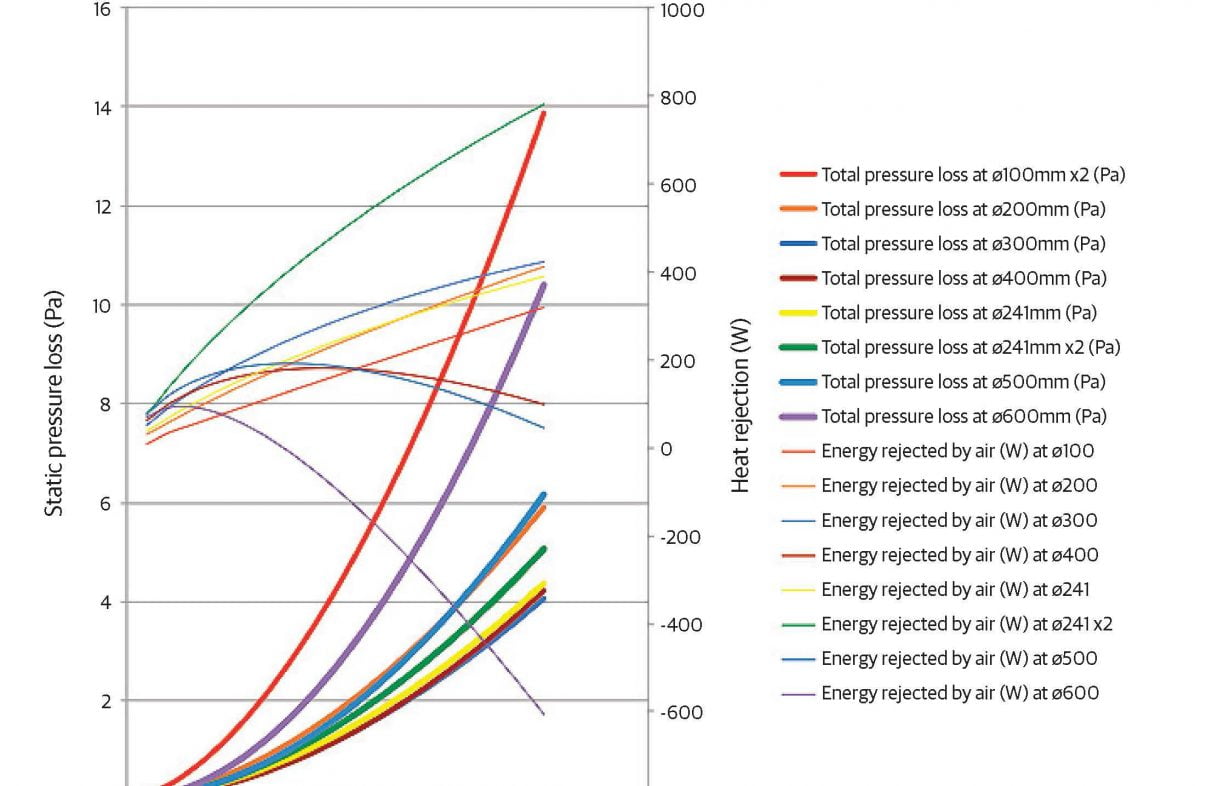
I had the good fortune to meet Alex Swanson, a natural ventilation engineer, who was keen to get involved with the design of the earth tubes. I did some basic energy modelling to estimate the summer cooling load and Alex calculated the earth tube parameters to provide adequate cooling. He investigated a range of diameters of PVC earth tubes, ending up with a design for two 240mm-diameter tubes each 18 metres long, buried at a depth of one or two metres at the deepest point, and both feeding into the main room.
A typical Earthship Biotecture earth tube is made of 250mm diameter corrugated galvanised steel and is about 7m long, with just one per room. My design changes were aimed at addressing Adelaide’s very hot summers and overcoming some problems I anticipated with other materials. Although PVC pipe is not a very eco material and not a good conductor of heat, it should have a long life, its smooth walls will be easy to clean and other Australian systems have reported good performance with PVC pipe. [ED note: Earth tube systems must be designed to prevent mould growth and moisture buildup. They should be easy to clean if needed. For more information on basic earth tube design requirements see www.bit.ly/1Ny9YDd and www.thenaturalhome.com/earthtube.php]
The longer length of tube is important to enable sufficient surface area and time for heat exchange to occur. The rate at which the air is drawn through the tube is also critical: too fast and the air doesn’t have time to cool down; too slow and you don’t get enough cool air into your building. The longer the pipe the greater the drag, so small diameter pipes may ‘jam’ (stop the airflow) if they are too long.
I have also incorporated a small sump where the earth tubes enter the building. This may serve as a mini cellar for storing wine and perishables but can also house an earthenware pot filled with water for evaporative cooling, ideal for the dry (low humidity) Adelaide summers. The sump has a water outlet for filling the pot and an electricity outlet to power a fan to enable air to be sucked into the earthship if it is cooler at night. The fan might also be useful if the greenhouse fails to perform its natural convection cycle overnight.

Other building changes
As the earth ship is going to be a B&B, I decided to provide backup heating for prolonged overcast winter weather. A small wood stove in the kitchen provides both heating and cooking. It also provides back up for the solar hot water system via a water jacket (wetback/boiler).
All timber is termite-resistant as this seemed the most practical way to deal with the termite issue, something they don’t have in Taos.
Exposed timber also had to be bushfire resistant. The site was assessed as being BAL 19, so it was important that the design respond to the bushfire threat. A green roof over the main room has a 150mm thick gravel layer which will be planted with fire-resistant, succulent ground covers. The greenhouse roof is corrugated iron, and lime or cement-based renders cover the rest of the earthship; tests by EcoFlex Pty Ltd, a NSW-based civil engineering company, demonstrate that so long as tyres (used as a wall material, see below) are protected by render they are not a bushfire hazard. The main weak points are the double-glazed windows on the greenhouse. I am going to protect these with butterfly sprinklers (also designed to wet down the corrugated iron roof) powered by the earthship’s tank water supply and electric pump. This is electric to avoid the need to deal with explosive fuel in a bushfire and is more suitable for automation.

Tyres as a wall material
Approximately 800 tyres were reused in the construction of the earthship and another 300 for the fire-fighting rainwater tank. Reusing tyres as a wall construction material has many advantages: they are free and they enable you to use another low-cost material — earth — to make your walls. Also, they are typically shipped off to Asia (millions per year from Australia alone) and burnt in waste-to-energy plants, releasing toxic particles into the atmosphere, so I think it is a better solution for this problematic waste material. The question of leaching or off-gassing of toxins from the tyres is often raised, but my research indicates that the risk from an earthship is low, as the tyres are isolated from water, air and extreme heat (see more about this online).
I contacted my local council and the EPA to check whether they had any issues with the use of tyres. There are rules in South Australia about how many tyres you can handle per annum (500) and there are guidelines about how to store them to avoid issues with rats and mosquitoes breeding in them and how to manage the fire hazard. I also found that, as I had council approval for my project, I could have had a limited licence, at a cost of $800, to ‘dispose’ of a certain number of tyres in the construction of the earthship.
As I had already substantially completed my tyre wall, however, this is something for next time. Many tyre retailers were willing to pay about $1 per tyre for me to take the tyres, so long as the EPA approval was in place.
Finding the right-sized tyres at times proved challenging. You can use just about any car tyre for an earthship wall but it’s easiest if all the tyres are a similar size. I tried to get the retailers to put aside the sizes I was after, but I often ended up having to dismantle huge piles of tyres to get at the ones I wanted.
In the end, I tracked down where most used tyres were being taken — a facility that shredded thousands of tyres every day to be packed into shipping containers bound for Asian waste-to-energy plants — and found this to be a brilliant source; they would put aside a huge, neatly stacked pile of my favourite-sized tyres for me to load into my ute/trailer. So good!
Tyres are such a versatile building material. Usually we just used them whole, putting some scrap cardboard (another reused material) in the bottom to prevent the earth from falling out the hole, but occasionally we cut them using a reciprocating saw to make half tyres, useful for the end of a wall. We also tried cutting out the upper side wall — tyre pounding is much easier with the side wall removed — but even though it only takes less than a minute to cut out the side wall, we felt that a whole tyre results in a better rubber-to-rubber connection between courses of tyres and therefore a more ‘bomber’ (earthship-speak for superior!) result.
The majority of fill for the tyres came from the initial excavation of the site. Very high in clay content, this was also used for adobe render and cob. We sourced some additional fill for backfilling the tyre wall via a ‘clean fill wanted’ sign at the end of the driveway.
A shortage of bottles and cans!
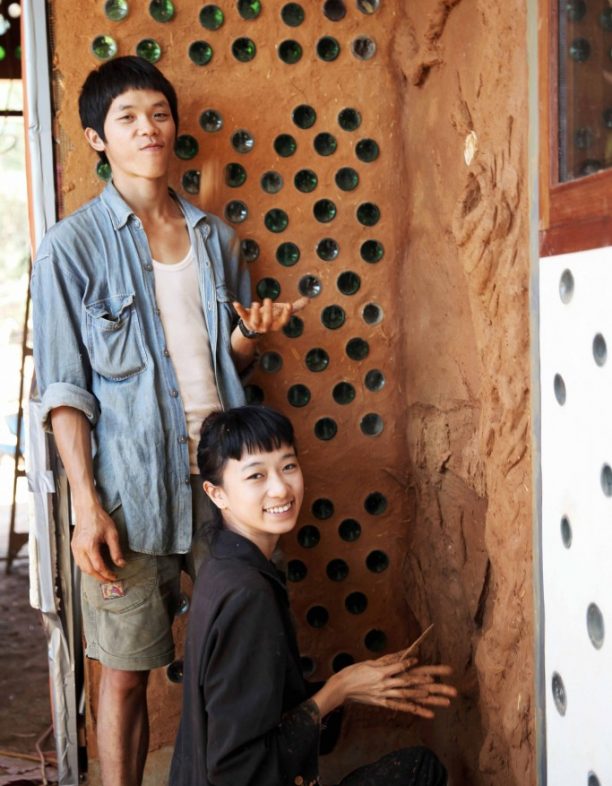
An unusual challenge building an earthship in South Australia was sourcing beverage containers for the bottle and can walls that are typical of earthships. In South Australia, beverage containers have a 10 cent deposit so they can be hard to come by. All the wonderful people who came to help build the earthship did an excellent job ‘making’ empty beverage containers, but we fell short of what we needed and had to buy empty cans!
We tried various methods to cut the bottles including bottle cutters, flaming string and thermal shock, but found that the Earthship Biotecture method of a wet tile saw was the quickest and most reliable, although the downside was the noise, mess from glass shards and danger. We cut off the neck of the bottle to the right dimension to suit the bottle wall, washed the bottle and, when dry, used duct tape to join the bottoms of two bottles together, sometimes mixing colours to get an interesting new colour. Many of the bottlenecks were recycled in the concrete bathroom floor as aggregate, replacing much of the gravel we would have otherwise used, but some were recycled, reluctantly accepted by the bottle recycler because we had not thought to separate the different colours of glass.
Many hands, many friends
The earthship was built in a series of workshops of about 20 weeks total duration. Most of the workshop participants had little building experience, which is quite typical of those involved in earthship construction, as it involves simple, easily learnt (though labour-intensive) construction methods, such as tyre pounding and rendering. The builders came from all over Australia and the world: from Canada, New Zealand, Taiwan, Italy, America, France, UK, Germany, Singapore and more.
Many camped on site. This led to wonderful friendships and information exchange on the construction site and around the campfire.
Although there was a substantial carbon footprint arising from all the interstate and international travel, balancing that was a growth in ecological awareness, new skills and ideas about living sustainably, which shouldn’t be discounted.
It was occasionally a bit stressful taking care of all these people, but in fact they were very self-sufficient and looked after themselves wonderfully well. I took out a public liability insurance policy which somewhat eased my anxiety, but thankfully there were no serious injuries on the construction site.
Sometimes over-enthusiasm and lack of experience meant a lower quality of workmanship and we had to redo things, but this didn’t happen very often. We re-did part of a tyre wall and also one bottle wall to ensure they passed muster, but the amazing instructors, whom I hired with the funds raised from the workshops, taught the participants well. Some of the participants were even tradies, who were an absolute blessing, rocking up with a ute-load of tools and a brain-full of know-how.
The final accounting
Currently the building is at lock-up stage with many of the internal finishes complete. There is still the bathroom to complete and a kitchen to build. This last stage is going slowly, as I’m only able to dedicate about a day a week to it, but it has been a great opportunity to spend time with my dad who is a great problem-solver and amateur builder. He often helps me on weekends, hanging doors, installing the extra-low-voltage DC lights, sanding, painting, etc.
Everyone asks how much it has cost. I estimate the final cost will be approximately $150,000, including the solar panels and batteries, rainwater tanks (three 5000 L poly tanks and one 40,000 L tyre tank), greywater system, septic system, pump — things that grid-connected houses don’t need to factor into the budget. Of that, around $16,000 was for the renewable energy system of 1 kW PV array, 600 Ah 24V sealed lead-acid battery bank and 3 kW SP-Pro inverter.
That equates to about $2000 per square metre, which is fairly typical of a bespoke house design, although it should be noted that most of the labour for tyre pounding and rendering was free, via workshops. The cost is comparable to what Reynolds quotes for this Global Model Earthship design (US$200/ sq ft). With the benefit of hindsight I’m sure I could reduce the cost.
This article was first published in issue 133 of Renew magazine. Issue 133 looks at reducing and reusing waste, gas vs electric heating, a double-glazing retrofit, our updated LED lighting buyers guide, a low-cost, carbon-neutral home in NSW & much more!
More on Earthships in Australia
This article was first published in Issue 133 (October–December 2015) of Renew magazine. Issue 133 has reuse and recycling as its theme.
Related articles
 ReNew
ReNew
Quick solar lighting
When I needed a light inside our new garden shed, a ready-made mini solar lighting system made it easy, explains Lance Turner.
Read more ReNew
ReNew
The cheapest way to save on electricity
Jack Gilding outlines his hot water system timer that reduces his water heating bills.
Read more ReNew
ReNew
A simple energy saver
One common cause of wasted electricity is when devices are left on unnecessarily, but there is a simple way to avoid that, writes Lance Turner.
Read more