DIY: Insulating aluminium windows
Many Australian houses feature aluminium-framed windows, which perform poorly thermally. But performance can be greatly improved with a simple DIY project. Glenn Newman explains how his friend Lisa Rime came up with an easy system for DIY double glazing.
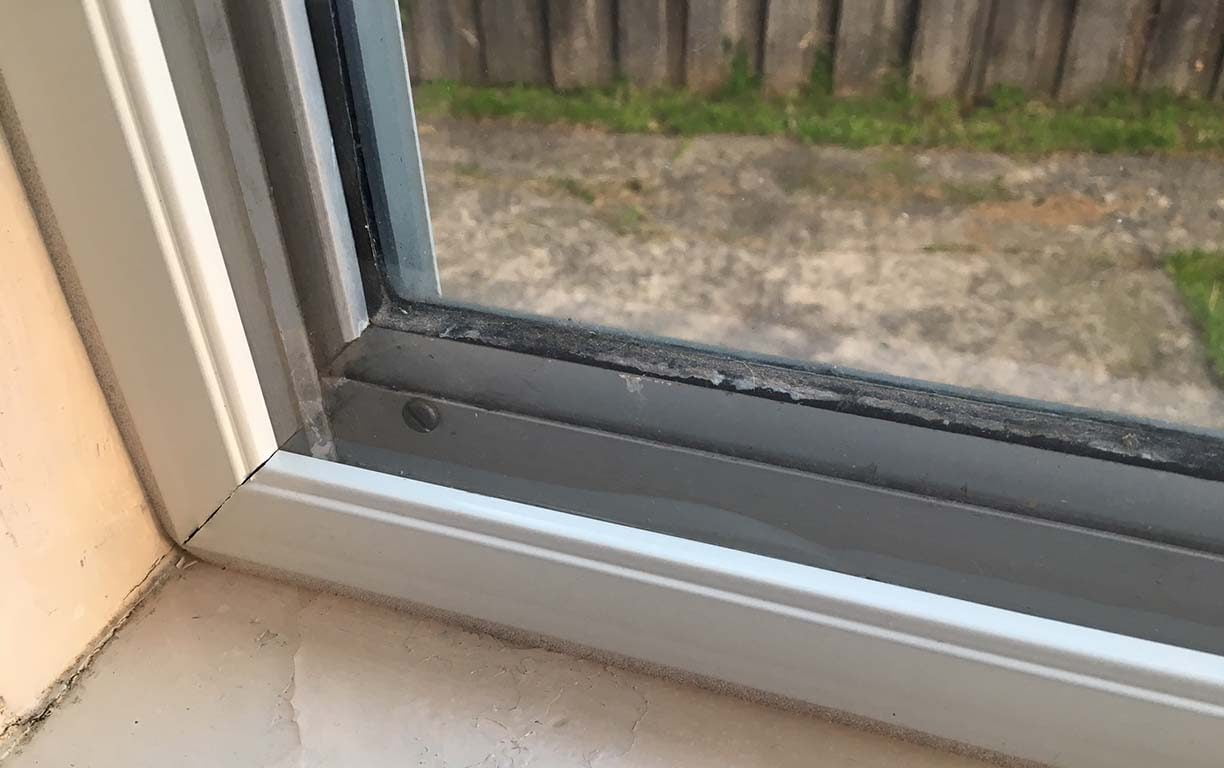
Single-pane aluminium windows are great for low maintenance, but they’re absolutely terrible for letting heat in and out of the home, with both the frames and glass being very thermally conductive. In winter, the warm air inside meets the cold window and the result is usually streams of condensation which can damage the window frames and encourage mould growth.
DIY insulating films
One solution is to apply a DIY double-glazing film to the window to create an air gap that provides good insulation.
DIY double-glazing film is a clear plastic film, similar to cling wrap, which you can attach to the window frame using double-sided tape. But this approach works best for windows with timber frames—timber has a reasonable insulation value and the roughly 10 mm thickness of the frame allows an optimal layer of air to be trapped.
With aluminium windows, the frames are too thin, allowing only around 2 mm to 3 mm of air to be trapped. This is not enough to provide effective insulation, and also doesn’t do anything about the frames conducting heat. Some double-sided tape used in these kits also doesn’t adhere well to some types of aluminium finish.
A more solid solution
So what can you do about it, especially if you’re in a rental house and can’t make any permanent modifications? You can easily build your own frames to fit inside the window sill which seal off the entire glass and frame!
You could make timber frames and finish them to your requirements (e.g. profile with a router, paint, stain, varnish). This will improve the appearance of old aluminium frames and provide great insulation value.
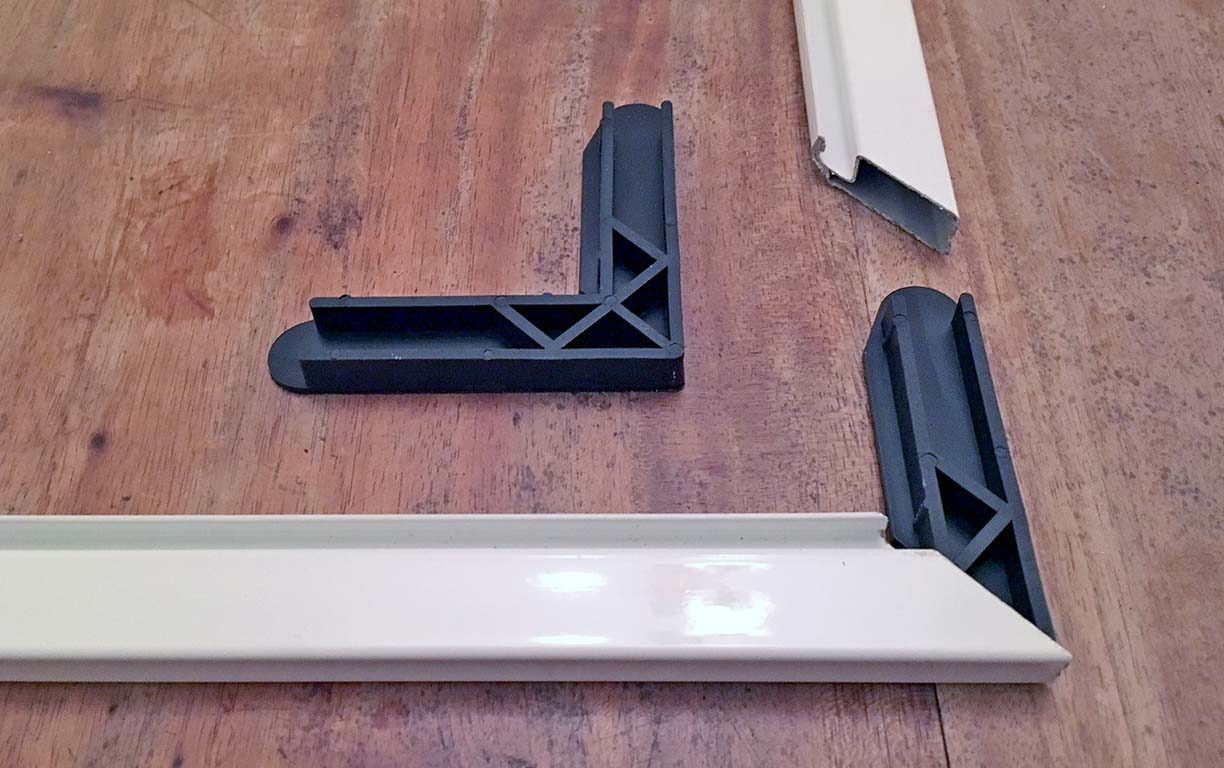
But making frames from scratch takes time and skill. A much cheaper and simpler way is to use an off-the-shelf material like flyscreen framing. This is easy to cut, join and ‘glaze’, and is quite cheap to buy.
The flyscreen frame is made of heat-conductive aluminium, but there’s a gap between the new frame and the original window, and the flyscreen frame is held in place with a foam strip, which acts as a thermal break, so there’s no thermal bridging.
My friend Lisa Rime has had great DIY success using these frames with clear tablecloth sheeting to insulate the windows of her rental house in Hobart. You can apply the same concept using window film, even applying a layer to each side of the frame to triple glaze your windows. The tablecloth material is stronger than the window film, but isn’t as clear or wrinkle-free.
This approach is also rental friendly by not applying any adhesives or fasteners to the dwelling, and the frames can be easily and quickly removed or modified if necessary.
They are also suitable for people considering more expensive double glazing options (using glass or acrylic secondary glazing layers, or replacing the windows with double-glazed units) to see how much of a difference double glazing will make.
If the film or vinyl is applied well it can last several years, but it can easily be damaged—however, replacing it is cheap and easy. Also, because the film is flexible, it provides none of the soundproofing benefits of rigid double glazing.

How it works
This approach uses thin vinyl tablecloth sheeting or window film as a double-glazing layer on the inside of the glass window. The vinyl or film layer is attached to a flyscreen frame that is ‘friction fitted’ into the window cavity. This method of frame construction will work for windows that:
- are no more than 2.5 metres on their longer side due to flyscreen material size
- are no more than 1.3 m on their shorter side for vinyl or 1.5 m for window film
- have enough depth in the window sill on the inside to insert the frame.
Equipment
- A large clean flat surface to work on
- Measuring tape
- Hacksaw
- Mitre box (nice for neat corners, but not vital)
- Vice (not vital)
- Scissors
- Pencil
For vinyl method:
- Wooden clothes pegs
- Spline roller (not vital)
For window film method:
- Hair dryer
Materials
- Aluminium flyscreen frames 25 mm x 2.5 m
- Flyscreen frame corner brackets
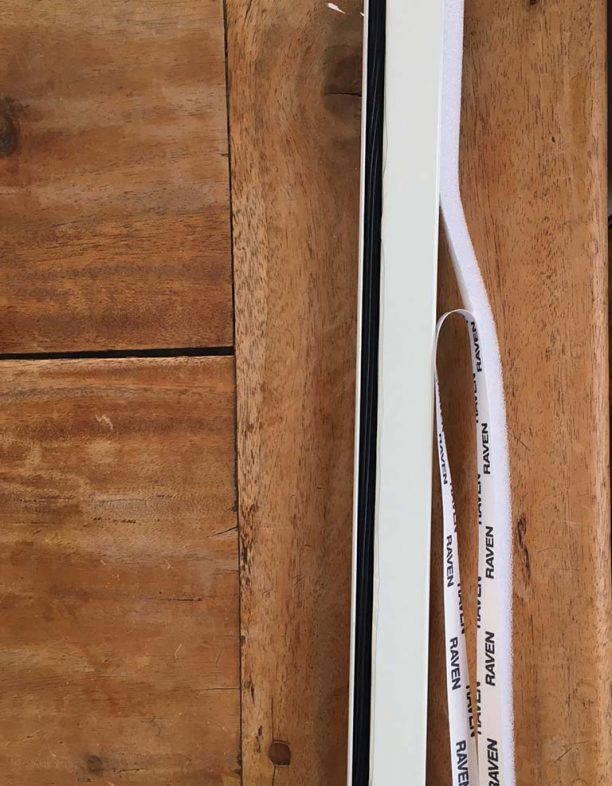
- 6 mm thick foam self-adhesive door and window seal, such as Raven RP14 seal
For vinyl method:
- 6 mm rubber flyscreen spline (a ridged rubber tube); cheapest off a roll
- Clear vinyl tablecloth cover, 1 mm thickness (available on a roll)
For window film method:
- Pack of DIY window insulating film, including double-sided tape.
Method
1. Estimate and purchase
Start by estimating and purchasing the right quantity of materials.
Carefully measure the window(s) you wish to fit and calculate the quantities of the flyscreen frame and vinyl/film you will require. Don’t just add up the total length of flyscreen framing and buy that much. Flyscreen framing comes in 2.5 m lengths which you will need to cut down to fit, so there will be some wasted offcuts. With a bit of sketching and basic maths you can add up the lengths required to use as much of each 2.5 m piece as possible, reducing waste.
If purchasing vinyl, take care that it doesn’t touch the floor or any dusty surfaces as it will pick up dust easily. It’s easiest to transport when folded very loosely.
2. Construct the frame
First, work out the exact length for each of the frame pieces. To do this, measure the window cavity at the point where you want the frame to sit; the ideal position is about 10 mm to 20 mm out from the glass. Measure the four sides individually—this is particularly important in older houses where window frames may not be square.
The frame pieces have a gutter on one side, which you want on the inside edge of the frame once it’s constructed. Cut each piece of frame to the required length with a hacksaw and a mitre box allowing for about a 3 mm to 4 mm gap between the inner edges of the window cavity and the outermost tips of the flyscreen frame lengths, and cutting the ends at a 45 degree angle, so that the gutter is on the inside edge. A mitre box helps with getting the angle right: it’s a three-sided box which is open at the top and the ends, wide enough to accommodate the width of the material to be cut. Slots cut in the walls of the box at the angle at which the cut is to be made (usually 45 and 90 degrees) guide the saw.
Push the corner pieces into the end of each frame piece to join them together. Take it to the window cavity to check how it fits before continuing. It should be able to sit within the cavity without friction, but with no more than a few millimetres clearance between each edge and the window cavity.
Now do either step 3a or 3b, depending on whether you are using vinyl or window film.
3a. Attach the vinyl sheet
Clean up your work surface or move to a clean one. The vinyl is prone to electrostatic charge and will attract dust very easily but is hard to clean.
Lay your frame down flat with the gutter facing upwards. Lay the vinyl on the top and flatten it out. Cut around it so that you have 50 mm or so extra material around the frame.
You hold the vinyl to the frame using spline rubber pushed into the gutter. But, first, temporarily attach the vinyl to the frame using the wooden pegs. This will make pushing in the rubber spline piece easier and yield a better, flatter result—the flatter the vinyl is, the less visible it will be. The aim is to stretch it flat, but not so tight that it warps the frame.
A good technique is to put the first peg in the middle on one side (tucking the excess vinyl under the frame as you go), then in the middle on the opposite side, then do the same for the last two sides. Next pull at the corners and peg from the centre pegs out to the corners.
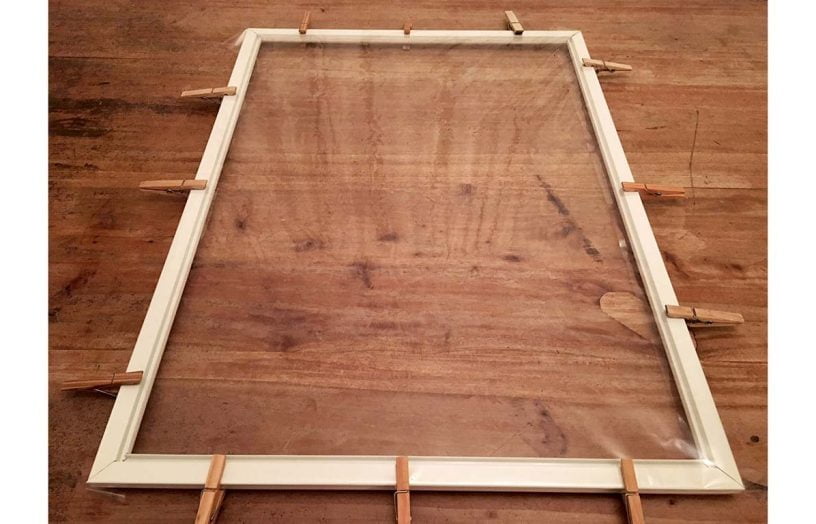
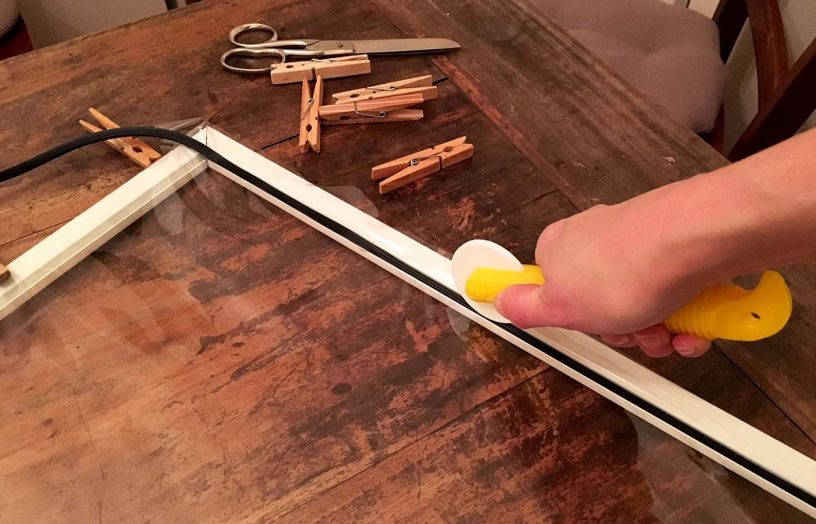
Now it’s time to put in the spline rubber. Start at a corner and work along the shortest edge first. Use the spline roller to push the spline into the gutter so that the vinyl is held firmly in place. Remove the pegs as you go. When you have made your way around the entire frame, trim the remaining spline off.
Trim off the excess vinyl with scissors, but leave a tab of vinyl at the centre of each side. These tabs can be handy for adjusting and removing the frame from the cavity later on.
3b. Fit the window film
Clean up your work surface or move to a clean one. Lay your frame down flat with the gutter facing upwards.
Make sure the frame is clean and grease-free so the tape adheres well. Wipe down with some methylated spirits if necessary. Allow to dry properly before applying tape.
Unfold the film ensuring that layers are not stuck together and cut roughly to the size of your frame, allowing at least 20 mm extra on all sides. You can trim the excess later.
Remove one side of the backing paper from the double-sided tape and stick the tape to the frame, making sure there are no gaps where the corners join. Before removing the other backing paper, press down with the back of a spoon to ensure the tape is firmly attached to the frame.
Stick the film to the tape, repositioning and stretching the film to ensure there are no wrinkles attached to the tape. Wrinkles and slack within the window frame are not a problem. Most people find it easiest to roll up the film, stick one edge and gradually unroll it down the frame.
Remove any remaining wrinkles with a hairdryer by starting in a corner and working methodically across the window, taking care not to touch the film with the dryer. Trim off any excess film beyond the line of the tape with sharp scissors or a craft knife.
If desired, turn the frame over and repeat on the other side for extra insulation.
4. Seal the edges of the frame
Stick the window and door foam to the outer edge of the frame, working your way around the entire frame.
5. Fit the frame into the window
Gently push your finished frame into your window cavity so that it creates a space between the new frame and the glass of 10 mm to 20 mm. It should fit so that the foam is pressing firmly against the window reveal, sill and head, creating an airtight seal.
If you are making frames for corner windows, foam gap filler rod can be pushed into the corner to take up the space between the two frames so that they sit firmly in place. It is available in various diameters to suit different windows.
 ReNew
ReNew
Quick solar lighting
When I needed a light inside our new garden shed, a ready-made mini solar lighting system made it easy, explains Lance Turner.
Read more ReNew
ReNew
The cheapest way to save on electricity
Jack Gilding outlines his hot water system timer that reduces his water heating bills.
Read more ReNew
ReNew
A simple energy saver
One common cause of wasted electricity is when devices are left on unnecessarily, but there is a simple way to avoid that, writes Lance Turner.
Read more