

Insulation in tricky spaces

Dick Clarke explores how to insulate unconventional spaces, from ceilings to slab floors, and make your home even warmer in winter and cooler in summer.
Everybody knows you can install insulation batts on a flat ceiling, and that sarking goes under roof tiles. But how do you insulate the tricky places? What can be done when renovating? And how should insulation be installed to avoid condensation, discussed in Sanctuary 18? Here are some suggestions for insulation that are not always considered.
Exhaust fans
First, let’s get a common problem out of the way: never dump exhaust fans into roof spaces. It is now prohibited by the National Construction Code under sarked roofs, but should not appear in any kind of roof. The reason is self-evident: all that moisture has to go somewhere. If it can’t get out, it will eventually saturate ceiling insulation and make its way back into the house, bringing mould in its wake. Wet bulk insulation doesn’t work, so always duct exhaust fans out through the roof or a wall.
Safety
Do not assume safety. As common sense and occupational health and safety regulations demand, electrical safety issues must be addressed before any insulation work in or on any part of a building. Foil has its own particular safety requirements. Every house should have a safety switch (earth leakage device, or residual current device [RCD]) fitted to all circuits, not just the power circuit. Test this before starting work.
Roof insulation
Raked ceilings and flat roofs: These are usually constructed where the ceiling is on the underside of purlins or rafters, and the roof battens and roofing are fixed to the top. This leaves the rafter depth as the only available space for insulation – which might be as little as 100 millimetres – so the insulation has to be very efficient.
If it is an unsarked metal roof and the roof sheeting is in good condition, expanding foam can provide all the insulation needed, provided the ceiling is not in the way. If rafter depth is more than 150 millimetres an environmental spray-in foam (such as Icynene) can provide insulation rated up to R6.5. [Note: Icynene is one such product but it should be noted that its website quotes US R-values, which are different from ISO R-values used in Australia. To convert an American R-value into a European U-value, divide 1 by the R-value, then multiply the result by 5.682.]
If the metal roof has a conventional foil-faced blanket (which provides about R0.5) but has very shallow rafter depth, install the thickest batts you can between the rafters first – perhaps R1.5 poly batts. Then install a foil-foam composite board such as Dow Tuff-R or Kingspan Kooltherm K1025 in continuous sheets underneath the rafters, with the foil side downwards. A slim batten or furring channel is then fixed to the rafters through the foam board to support the ceiling with an air gap to the foil above. Fifty millimetre thick Tuff-R gives R2.27 plus reflectivity from the air gap. This will give a total constructed R-value of about 4.4, with all surfaces considered. Not bad for such a thin roof structure, but check that the finished floor-to-ceiling height meets the required minimum habitable room height of 2.4 metres. If you have deeper rafters in the same overall insulation design – but with thicker batts in the rafter space – the overall R value will increase.
Unsarked tiled roofs: There are only a few options for insulating existing tiled roofs. Heat can make its way inside a home through a hot tiled roof, but before leaping on sarking as a quick fix, consider condensation [Ed note: see Sanctuary 18, p86]. If the sarking is the only non-permeable membrane above the ceiling, it may cause problems – see the section on ceilings below.
If the tiles are in good condition and are unlikely to need lifting in the foreseeable future, expanding foam can be sprayed on the underside. It will expand downwards until the rafters are only just visible. While highly effective, a downside of this solution is that it becomes almost impossible to remove the tiles without damaging them or the foam.
Flat ceilings: If you are building from scratch, or at least installing a new ceiling, approach insulation as you would for a raked ceiling. If retrofitting over an existing ceiling, there are a couple of options. One is expanding foam spray, but all cabling must be raised above it and any light fittings enclosed in vented boxes. This is another reason to be rid of halogen downlights, as LEDs and CFLs require less venting.
Alternatively, and keeping in mind the need for safety, concertina foil batts can be installed at ceiling level with R4.0 bulk batts directly over. The concertina cross-sectional shape provides the required air gap for the foil to do its reflective work, and the batts above keep the cold air from causing condensation. This compound insulation is extremely effective for all seasons.
Walls
Timber-framed: When insulating timber-framed walls, it is best to ensure that water vapour can still move through the structure, even when all windows and doors are closed. The presence of water is unavoidable, natural, and to some degree necessary for human health and comfort. What’s important is ensuring vapour permeability and managing the moisture. Timber-framed walls are often large enough to allow water vapour to transfer freely from the whole house – stud framing can be insulated effectively and still allow vapour balance to occur.
Cavity brick and reverse brick veneer: When insulating walls during construction there are a number of products available, but always choose one that is highly vapour permeable. A non-breathing foil in a narrow cavity, for example, has no way of preventing condensation.
A neat trick for reverse brick veneer is to use high load bearing bricks that can carry the required loads in a single skin with an exterior insulation finishing system (EIFS – a foam insulation board with a rendered external skin). Products such as Isoboard, at 75 millimetres thick, with 10 millimetres of render, fixed directly to 140 millimetre thick brickwork, will give a total R value of about 2.5, which combined with the insulated internal thermal mass contributes to passive design. But this system will not provide vapour transfer for the whole house, and so in colder climates thickness should increase to 90 millimetres or more to prevent condensation.
It’s possible to retrofit cavity wall insulation, but doing so may cause some disruption, and costs vary. Granular rockwool, such as Bradford Fibertex, or expanding foam can be injected into the cavity. In brick veneer this can be done from above through the roof, but bear in mind that installing it in the narrower cavities found in double brick walls might require drilling many small holes, which then have to be filled and made good. Despite the effort the end result is spectacular, allowing older houses to achieve a 7 or 8 star energy ratings. When retrofitting, make sure all wiring and services in the cavity are correctly positioned and in good condition. It is also wise to add a conduit down the cavity in diagonally opposite corners of every room before filling, to allow for the installation of unforeseen cabling in the future.
Floors
Raised timber, steel or suspended concrete: If your floor is elevated, it is essential that it be insulated. Sprayed foam can be a good choice as it prevents vermin from getting into cavities. If you choose any other type, such as bulk batts, all cavities between joists must be sealed to keep critters out. Exposure to bushfire may also mean you have to add a protective skin to the underside of the floor – magnesium oxide or fibre cement sheet being the obvious choices. If you have steel framing and are located in a climate with cold winters, a thermal break beneath the joists is advisable.
Concrete slab on ground: New slabs can be insulated completely, depending on your climate zone, or just at the edges. This is still a new idea for much of the design and building industry, but has been common in Europe for a generation. Australia’s mild climate means that full insulation is often not necessary, but slab-edge insulation is always a good idea. The edge of an uninsulated slab follows external temperature changes closely, so adding at least R1.0 is of great benefit.
Sub-slab insulation must be engineered into the slab design, sitting beneath the floor panels and between the deep foundation beams. Dense polyisocyanurate (PIR) foam, or the lighter expanded polystyrene (EPS) foam can be used, depending on the floor loading. The common waffle pod slab also provides useful levels of sub-slab insulation, along with its egg-crate stiffness.
Slab-edge insulation is simple to install during construction. The PIR or EPS foam board is placed against the formwork, with a physical (non-chemical) termite barrier and vapour barrier wrapped around the whole. The concrete is then poured, making it simple to install. The easiest and most cost-effective system is to use a combined termite barrier and vapour membrane, such as HomeGuard TMB. It is also possible to retrofit slab-edge insulation, following a similar principle.
 Efficient homes
Building for a changing climate
Are we building homes for the future, or for the past? Rob McLeod investigates how climate change is impacting home energy ratings and the way we build our homes.
Read more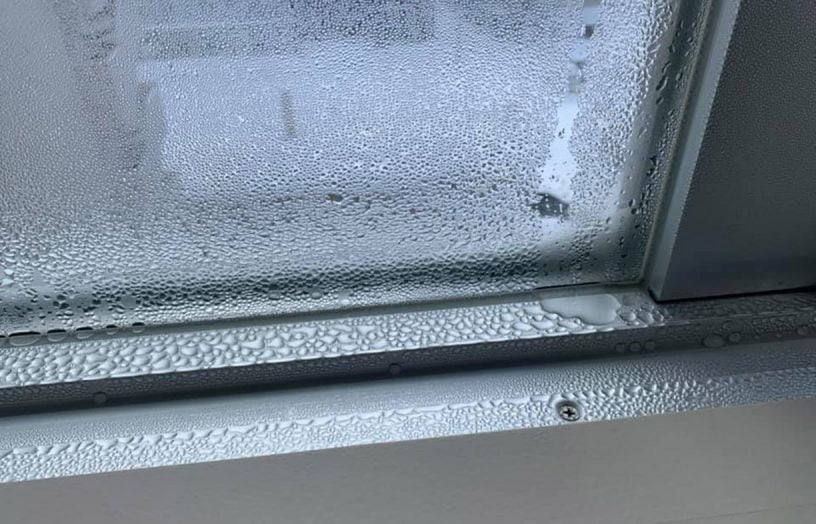 Efficient homes
Condensation management
It’s important to consider both ventilation and moisture control in order to avoid condensation problems. Jenny Edwards recommends a holistic approach.
Read more Buyers guides
A draught sealing buyers guide
Draughts can make your home far less comfortable than it needs to be, particularly in winter. Sealing them up is one of the simplest things to do for an energy-efficient home. Find out where the gaps are and how to fix them in our first-ever draught sealing buyers guide.
Read more