

All-electric and hydronic: A model of efficiency
There’s a lot to learn from this highly insulated and well-sealed renovation in Melbourne, not least how a heat pump is providing both hydronic heating and hot water. Cameron Munro explains the house’s modelling-led upgrades and the tweaks made along the way.
This article was first published in Issue 141 (Oct-Dec 2017) of Renew magazine.
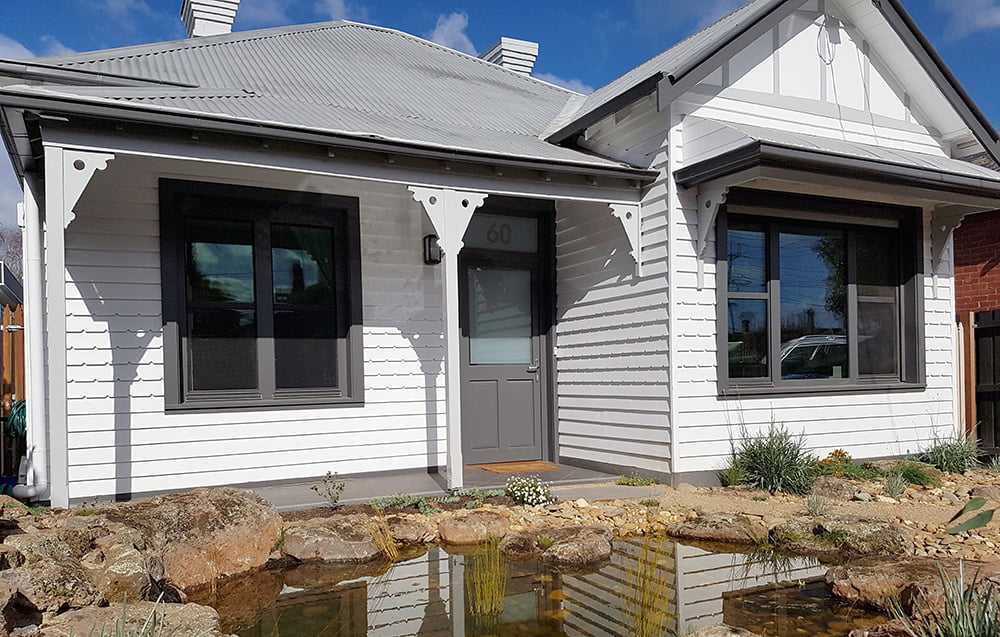
When we bought our 1910 weatherboard home in inner suburban Melbourne, we were committed to making it as comfortable and energy efficient as we could. We’d partially renovated a previous home by installing double glazing and injecting foam into the wall cavity, but our new home presented the opportunity to do a far more extensive renovation.
Our approach was guided by the German Passivhaus movement (also known as Passive House in Australia), which requires extensive insulation and extreme attention to thermal bridging and airtightness. We really liked this approach as it’s guided by building physics and requires extensive modelling and verification. Moreover, we weren’t comfortable with the usual practice of simply throwing energy into a building to keep it comfortable; whatever additional heat we needed, we wanted to ensure we could keep it within the building envelope for as long as possible.
First things first: going off gas
The previous owner used a conventional gas storage hot water system and gas heaters. Our strategy for heating and hot water was always going to be all-electric using an air-source heat pump and solar PV. We liked the simplicity of minimising our grid connections and had concerns about the carbon footprint from gas production and use. One of the first things we did was to have the local gas network utility remove the gas meter and cap the gas main in the street. This was surprisingly easy to do, and cost us nothing.
Insulation, thermal mass
Extremely high levels of insulation were installed throughout the house as part of the renovation—the 1980s extension was demolished and replaced, and the original front section stripped out internally. This resulted in insulation levels equivalent to around R7 in the ceilings, R5 in the walls and R4 underfloor. The walls all use a double 90 mm stud construction, and the studs are offset to minimise thermal bridging. We also offset the studs at external corners to enable insulation to be installed in the corners to minimise geometric thermal bridges.
We tried to minimise the use of steel in the construction, but there were a few locations where it was essential. Where this was required, we ensured the steel was wrapped in high-performance phenolic foam to keep it to the ‘cool’ side of the thermal envelope. The modelling suggested the steel would otherwise represent a very significant thermal bridge.
We replaced all windows with argon-filled triple glazing with low-emissivity film. As best as possible we tried to orient windows to face north to maximise passive solar gain, and used a small exposed concrete slab and rammed earth wall as thermal mass.
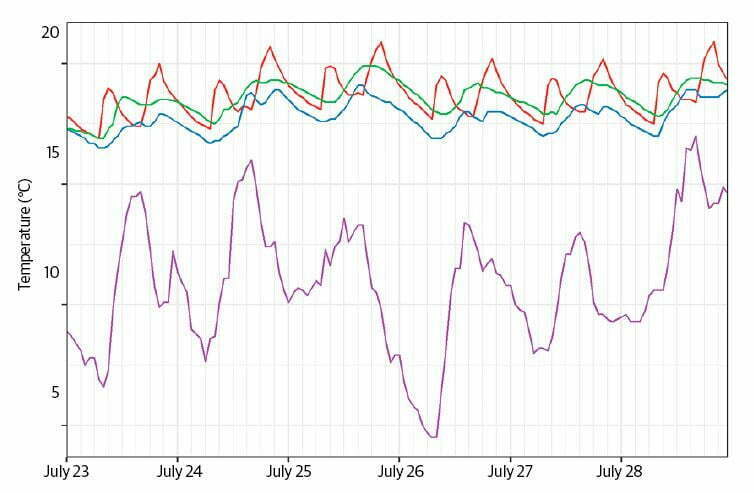
The result is that overnight temperatures inside the house drop by only around 2 °C during the coldest part of winter. For example, as shown in Figure 1, on the evening of 25 July the temperature outside dropped from a high of 13.6 °C at 4 pm to 4.5 °C at 7 am the next morning. The internal building temperature declined by just 2 °C over the same period, to a comfortable 17 °C in the living room.
Active heating needed
The modelling we did on the building suggested we would need some additional heat load in the winter months despite the high performance of the building envelope. This was, in part, due to the poor solar orientation of the building (the short street frontage faces north) and heritage restrictions which precluded significant modification to the facade.
Our preference was for hydronic heating, as we’d lived in northern Europe and experienced the comfort that comes from this form of heating. Indeed, having rented a home with ducted gas heating we felt well placed to judge the benefits of radiative versus convective heat sources. What really surprised us about ducted heating was the electricity consumption to push the air around (on top of the gas used for heating), and the dust that also got blown around the house. Given the choice there was no way we would consider ducted heating.
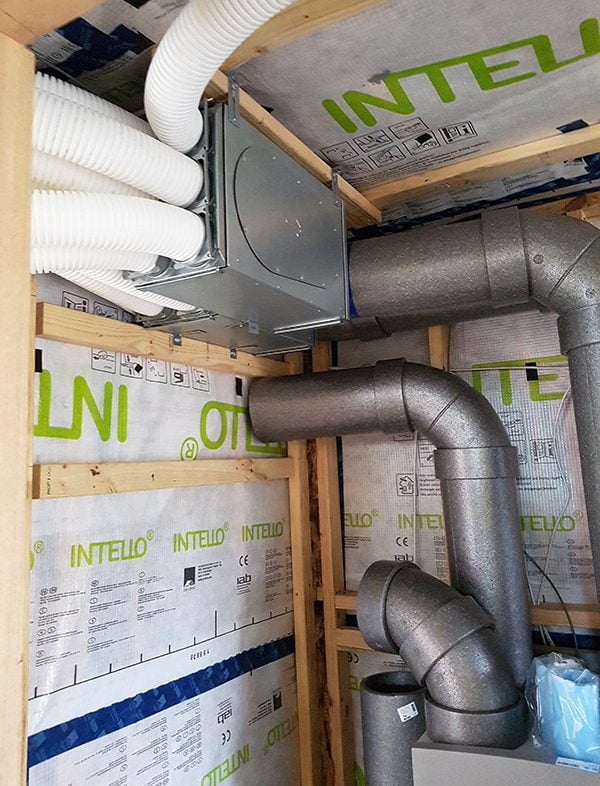
We felt the best means of providing hot water and heating was to use an air-source heat pump. Solar hot water presented plumbing complications that we felt could be avoided using the roof space for solar PV instead. We were initially planning to use a Sanden heat pump to provide both hot water and heat for the hydronic system. However, after initially exploring this option, we found that Sanden no longer warranted their heat pumps for hydronic systems. Instead, we opted for a Tivok heat pump system, costing $7700 plus $9000 for installation.
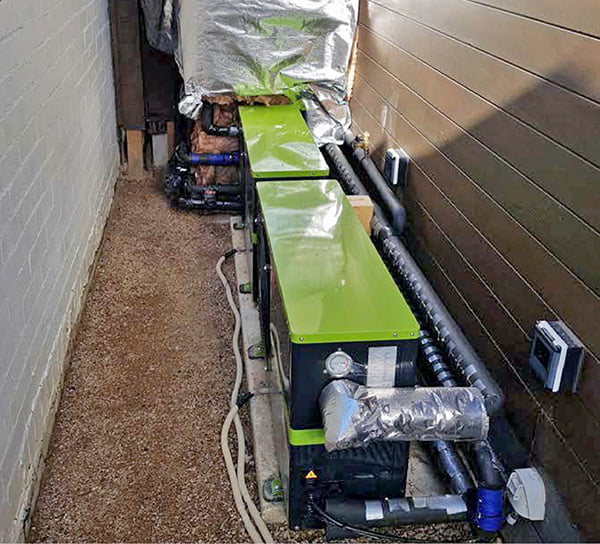
Our system has two 7.2 kW heat pumps to heat a 420 L storage tank which has an integral heat exchanger (the hydronic water flows through this heat exchange coil and is never in danger of Legionella breeding due to its low volume of around 7 litres) . The heat pumps perform at a coefficient of performance (COP) of around 4.2 at 20 °C ambient air temperature, but between 2.6 (5 °C) and 3.3 (10 °C) at temperatures where heating is likely to be required. This means each heat pump generates 4.5–5.6 kW of heat across this critical temperature range.
In the summer we used only one heat pump, set on a timer to operate during peak insolation times between 11 am and 3 pm. We found this was sufficient to fully heat the tank and provide more than enough hot water for the three occupants. With 6.4 kW of solar PV, even on an overcast summer day, we’ve so far not had to import electricity from the grid to power the heat pump during summer.
Winter challenge
During winter, the situation gets more challenging. As well as servicing the home’s hot water needs, the heat pump and tank provide heat for the hydronics circuit. The heat pumps are programmed to run in winter between 6 am and 8 pm, though they generally only run for five to six hours.
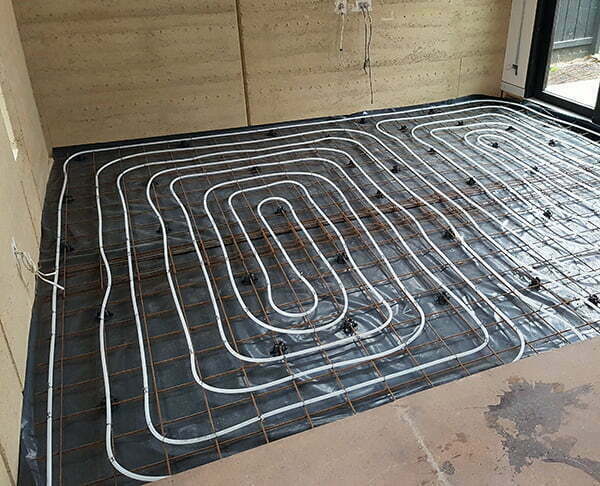
The hydronics circuit has a coil running through the storage tank to heat the hydronics loop which then feeds into two heated towel rails in the bathrooms (each about 0.7 kW at 50 °C) and a small area of in-screed floor heating in the living room, producing about 2 kW at 28 °C water temperature (the in-screed circuit is tempered through a manifold). The in-screed heating sits on a foam insulation base to decouple from the concrete slab, and is internal to the wall insulation.
The total heat input into the building is about 3.4 kW, which is less than the 4.5–5.6 kW that can be produced by one heat pump and more than the modelled heat loss for the entire home of 2.5 kW for an internal–external temperature difference of 15 °C.
The heat is distributed to other rooms in the home using a mechanical ventilation and heat recovery (MVHR) system, which also introduces fresh air to the building. This is required because of the high level of airtightness achieved in the building (1.2 air changes per hour at 50 Pa; mechanical ventilation is required below around three air changes per hour). Without the ventilation system, the building rapidly becomes quite stuffy inside. The system runs constantly, drawing about 50 W to distribute 100 m3 of fresh, pre-heated air into the home each hour.
A little low on heating load
In practice, in the one winter we’ve been in the home so far, we’ve found that we’re probably a little bit low on heating load, perhaps by 1 kW to 2 kW. We’ll be able to readily add a couple of radiators to address this. At 5 kW for a building with a floor area of around 143 m2 that’s still a very low heat load.
We’ve set the thermostat to operate the hydronic heating from 7 am to 9 am and 4.30 pm to 8 pm only. This seems sufficient to keep the building comfortable most of the time. Using in-screed heating rather than trying to heat the entire slab likely means a faster reaction time, and in the evenings the concrete certainly feels warm and comfortable underfoot.
We’ve found that we don’t need to operate the heater thermostat at the 20 °C to 21 °C that a conventional home may need. The internal surfaces of the walls and windows stay no more than 4 °C cooler than the internal air at all ambient air temperatures. This means we don’t get the cold, convection-driven draughts that happen in a standard home, nor do we get a chill feeling near cold surfaces. As a result, the home feels comfortable at temperatures between 18 °C and 19 °C.
Energy use and performance
While we are net importers from the electricity grid on most winter days across the year, we expect to be electricity positive due to the large solar export in the summer months.

Our average energy use is around 16 kWh per day in summer and 25 kWh to 30 kWh per day in winter. This includes around 8 kWh per day to charge our plug-in hybrid car, mostly overnight as the car is in use during the day. I don’t have the breakdown for heating, hot water and other uses, but a rough guess would be that heating uses around 10 kWh to 15 kWh per day in winter. Figure 2 shows a breakdown of typical days in summer and winter.
While we’re slightly short of heating load on the coldest winter days, we’re happy with the overall performance of the air-source heat pump. We’ve not yet run out of hot water for showering and the system seems to be operating in a set-and-forget mode, although I can’t help but continuously tinker to optimise the system performance.
Hydronic lessons learnt
One of the main things we’ve learnt from this experience has been the importance of insulating the hydronic pipes. The PEX pipes that run underneath the floor had 6 mm of insulation, but even this was partially removed by the plumber over roughly one metre lengths near the floor penetrations and not reinstated. By our calculations we were losing around 1.2 kW through the piping, of which about two-thirds was in the short uninsulated sections. Given the heating output of 3.4 kW this made for an awful system efficiency. To rectify this we added two layers of pipe insulation (glued and taped at joins) to give around 30 mm of insulation, which we estimate has reduced the line losses to about 300 W. Of course, it would have been much easier to ensure the insulation was of high standard before the piping was installed.
There were also a few metal connections on the tank, some not even in use, which were sitting at over 35 °C as a result of being thermally coupled to the water in the tank. In addition, a thermal camera revealed the top of the tank in particular was warm. The tank is insulated to R3 with 60 mm of polyurethane. We added to this with two layers of space blanket wrapped around the tank and exposed fittings, which should now mean a tank R-value of around R6.
This article was first published in Issue 141 (Oct-Dec 2017) of Renew magazine. Issue 141 is our energy savings special.
Recent articles
 Efficient homes
Building for a changing climate
Are we building homes for the future, or for the past? Rob McLeod investigates how climate change is impacting home energy ratings and the way we build our homes.
Read more Reuse & recycling
Recycled hydronic heat
Renew’s sustainability researcher Rachel Goldlust gives us a view of and from the Salvage Yard.
Read more Efficient homes
Gas and our health
Dr Ben Ewald uncovers the health effects of gas in the home.
Read more